Use the arm sleeve of t-shirt to make a doggie vest. I love to recycle and we are always looking for creative ways to reuse and reduce. We used a t-shirt that had some stains and lots of wear to make a messenger bag then we used one of the sleeves to make a doggie vest.
Instructions:
1. To make the vest I cut the sleeve along with about 4" of the chest.
2. Using the hem of the sleeve thread elastic through.
3. Sew the elastic in place.
4. Cut out and hem the leg holes. Shape the vest into a cape like fashion so that the top is long and the underneath is short.
5. Pin done some ribbon.
6. Sew the end of the ribbon to the top of the vest. Then slide the d-ring on.
7. Sew the rest of the ribbon in place.
8. Your doggie vest is complete.
To learn how to make a scrap ribbon bow to pin to the doggie vest visit the Bowdabra Blog.
With the rest of the t-shirt my daughter made a messenger bag.
An online journal of all my sewing, crafting, and hair bow making adventures!
Showing posts with label Recycling Crafts. Show all posts
July 17, 2013
Recycled T-Shirt Doggie Vest
July 16, 2013
Recycled T-Shirt Messenger Bag
Sew a messenger bag using a recycled t-shirt! This style messenger bag is really easy to make. My daughter was really excited to recycle her dad's Army t-shirt into soft messenger bag that she could use to hold her books and journal.
I used a quilting mat and rotary cutter to cut the front, back, 2 sides, and one bottom piece. Using a sewing machine my daughter sewed the sides to the front and back and then the bottom piece.
To finish the messenger bag we added a ribbon hem around the top edge and a ribbon strap.
Check back tomorrow when I share how I recycled one of the t-shirt arm sleeves into a doggie vest.
-->
I used a quilting mat and rotary cutter to cut the front, back, 2 sides, and one bottom piece. Using a sewing machine my daughter sewed the sides to the front and back and then the bottom piece.
To finish the messenger bag we added a ribbon hem around the top edge and a ribbon strap.
Check back tomorrow when I share how I recycled one of the t-shirt arm sleeves into a doggie vest.
-->
April 10, 2013
Recycled Altoid Dispenser
So....we have a serious addiction to Altoids here at my house. However, we like licorice and ginger and I can only buy those in bulk. I came across a wooden dispenser at Goodwill that I think is some sort of pipe box. I knew instantly that it would be perfect for an Altoid dispenser to hold all our little metal boxes.
I bought the box at Goodwill for $1.99. Before transforming it I wiped it down with a wet washcloth to remove all the dust. I then finished the wooden box with Martha Stewart Paper, Antique Mod Podge, and a Mini Bowdabra Bow.
Here is a list of my materials:
For the full tutorial please visit my detailed instructions on the Bowdabra Blog.
I bought the box at Goodwill for $1.99. Before transforming it I wiped it down with a wet washcloth to remove all the dust. I then finished the wooden box with Martha Stewart Paper, Antique Mod Podge, and a Mini Bowdabra Bow.
Here is a list of my materials:
For the full tutorial please visit my detailed instructions on the Bowdabra Blog.
Labels:
Bowdabra Projects,
Earth Day,
Paper Crafting,
Recycling Crafts
April 8, 2013
Celebrate Earth Day with a Scrap Fabric Wreath
I love using recycled materials to make crafts - and I don't limit re-purposing to Earth Day. However, Earth Day is a great excuse to showcase my recycling crafty talents.
Did you know that it only takes one twin bed-sheet to make a scrap fabric wreath? True! I used every bit of the fabric but I was able to make a full fabric wreath with one twin bed-sheet.
Here is another little tip - Always use a sheet that is printed on both sides. This way your wreath is uniform in color.
I cut my fabric 3" wide by 7" long. The result was chunky fun spring style wreath!
Visit the Bowdabra Blog for the full tutorial and all the deets for making a pretty bow to compliment your scrap fabric wreath.
Did you know that it only takes one twin bed-sheet to make a scrap fabric wreath? True! I used every bit of the fabric but I was able to make a full fabric wreath with one twin bed-sheet.
Here is another little tip - Always use a sheet that is printed on both sides. This way your wreath is uniform in color.
I cut my fabric 3" wide by 7" long. The result was chunky fun spring style wreath!
Visit the Bowdabra Blog for the full tutorial and all the deets for making a pretty bow to compliment your scrap fabric wreath.
January 28, 2013
Recycle Puzzle Pieces into Necklaces
Recycle little puzzle pieces into fun necklaces for Valentine's Day or Best Friend Forever (BFF) necklace charms.
January 29, 2013 is National Puzzle Day (who knew), and in honor of the day, my daughter and I made these cute puzzle necklaces, this weekend.
My daughter loved painting the puzzle pieces and then finished hers with rhinestones. Little girls love rhinestones!
I was inspired to make this puzzle craft from some tutorials I found -
Puzzle Necklaces by Craft Tuts+
Best Friend Puzzle Necklace
-->
January 29, 2013 is National Puzzle Day (who knew), and in honor of the day, my daughter and I made these cute puzzle necklaces, this weekend.
My daughter loved painting the puzzle pieces and then finished hers with rhinestones. Little girls love rhinestones!
I was inspired to make this puzzle craft from some tutorials I found -
Puzzle Necklaces by Craft Tuts+
Best Friend Puzzle Necklace
-->
July 25, 2011
Projects using Recycled Bottle Caps
It wasn't till today when I was writing up a post for the Bowdabra Blog on how to recycle bottle caps for hair bow centers and scrapbooking that I realized all that I have create with bottle caps! I think it might be slightly higher than average!?! Gasp, I might have a bottle cap recycling problem.
I have piles and piles of bottle caps. I drink certain drinks because they have really great bottle caps (Izze Sparkling Flavored Water, to name one). If it twists and it is a cap, it is a keeper! I don't like the ones you need a bottle opener for, it ruins the shape!
Here are a few of the projects I have used recycled bottle caps for:
I have piles and piles of bottle caps. I drink certain drinks because they have really great bottle caps (Izze Sparkling Flavored Water, to name one). If it twists and it is a cap, it is a keeper! I don't like the ones you need a bottle opener for, it ruins the shape!
Here are a few of the projects I have used recycled bottle caps for:
(decoupaged and embellished little buggies from bottle caps)
(painted bottle caps!)
(decoupage bottle caps with sticker letters)
(bottle caps with decoupaged flower photos)
July 23, 2011
Turning Toothbrushes into Art
My children and I were at the See Science Center yesterday and there was a teeth cleaning exhibit.
Part of the exhibit was hands-on where children could role play being a dentist. I completely fell in love with the cabinets in the exhibit notice the handles are toothbrushes!
After seeing this display it got me thinking what other ways can you recycle toothbrushes?
Make a bracelet like Two Girls Being Crafty did! Click here for their awesome tutorial.
Use an old toothbrush to splatter paint for a fun art deco effect. Visit Handmade in the USA, Craft Ideas for other ways they re-purposed a toothbrush. Click here for crafty uses of a toothbrush, they have some really neat ideas!
Part of the exhibit was hands-on where children could role play being a dentist. I completely fell in love with the cabinets in the exhibit notice the handles are toothbrushes!
After seeing this display it got me thinking what other ways can you recycle toothbrushes?
Make a bracelet like Two Girls Being Crafty did! Click here for their awesome tutorial.
Use an old toothbrush to splatter paint for a fun art deco effect. Visit Handmade in the USA, Craft Ideas for other ways they re-purposed a toothbrush. Click here for crafty uses of a toothbrush, they have some really neat ideas!
June 22, 2010
4th of July Kids Craft
Children will have so much fun making this hanging firecracker for the Fourth of July. This decoration looks wonderful in any window or on your front porch. The wind catches this ornamental firecracker and sends it spinning in red, white, and blue delight!!
Up, up, in the air it soars with its tail of red, white, and blue.
Things You'll Need:
* Quakers Oats Cylinder
* Blue Poster Board
* Red and White Construction paper
* Curling Ribbon (red, white, and blue)
* Tape
* Glue
* Scissors
* Hole Puncher
Instructions:
1. Remove the cap and cut off the underneath of a Quaker Oats Container.
2. Cut a blue piece of poster board to fit the entirety of the Quaker Oats Container. Tape the poster board to the container.
3. Draw different sized stars on red and white construction paper. Cut out the stars and glue them on to the blue poster board.
4. Hole punch the bottom of the Quaker Oats Container (the end without the plastic rim). The bottom of the container is the top of your firecracker. Evenly space 6 holes around the bottom rim of the container.
5. Tie one end of curling ribbon inside one hole, tie the other end of ribbon to the opposite hole. Use all six holes and all three colors of ribbon.
6. Once ribbons have been strung, combine them at the top and tie a ribbon around them. This will form the loop that easily allows you to hang the firecracker.
7. With the remaining curling ribbon make your firecracker tails. Cut ribbon strips about 24 to 36 inches in length. Bundle the ribbon and tie a knot at the top (about 8 ribbon strands to a bundle). Tape each bundle to the underneath of your firecracker (above the plastic rim).
8. Hang on a porch or in a window.
Visit my Children's Craft Column with the Examiner for daily kid craft ideas.
Visit my post at Crafts Unleashed for making a 4th of July Wreath.
Up, up, in the air it soars with its tail of red, white, and blue.
Things You'll Need:
* Quakers Oats Cylinder
* Blue Poster Board
* Red and White Construction paper
* Curling Ribbon (red, white, and blue)
* Tape
* Glue
* Scissors
* Hole Puncher
Instructions:
1. Remove the cap and cut off the underneath of a Quaker Oats Container.
2. Cut a blue piece of poster board to fit the entirety of the Quaker Oats Container. Tape the poster board to the container.
3. Draw different sized stars on red and white construction paper. Cut out the stars and glue them on to the blue poster board.
4. Hole punch the bottom of the Quaker Oats Container (the end without the plastic rim). The bottom of the container is the top of your firecracker. Evenly space 6 holes around the bottom rim of the container.
5. Tie one end of curling ribbon inside one hole, tie the other end of ribbon to the opposite hole. Use all six holes and all three colors of ribbon.
6. Once ribbons have been strung, combine them at the top and tie a ribbon around them. This will form the loop that easily allows you to hang the firecracker.
7. With the remaining curling ribbon make your firecracker tails. Cut ribbon strips about 24 to 36 inches in length. Bundle the ribbon and tie a knot at the top (about 8 ribbon strands to a bundle). Tape each bundle to the underneath of your firecracker (above the plastic rim).
8. Hang on a porch or in a window.
Visit my Children's Craft Column with the Examiner for daily kid craft ideas.
Visit my post at Crafts Unleashed for making a 4th of July Wreath.
June 21, 2010
Canning Jar Teacher Gift Ideas
We love Classico Pasta Sauce at our home. The pasta sauce comes in nice large Mason Jars. When the jars are empty; I wash, remove the label, and store away for crafts.
Recently, I made several gifts using the mason jars. I needed some end of the year teacher’s gifts. I purchased several containers of trail mix. The brightly colored M & M’s screamed: “Teacher Theme”. I used teacher themed cardstock and wrapped a strip around the jars.
I attached a strip of “School Days” Morex Bobbin Ribbon around the edge of the can lid. Next, I added a cardstock circle on top of the lid. I then finished the gift by adding “ABC” letter punches and an apple with a brown pipe-cleaner stem.
I filled the “Teacher Themed” Mason Jars with trail mix and then placed the heavy jars into wine bags that I decorated with a “Teacher Theme”, as well. The wine bags work great, they are the right size and are meant for holding heavy bottles.
Links:
Getting Creative with Blank Cards
Gift Giving on a Budget - Teacher's Gift
Jar Crafts for Kids
Scrapbooking Supplies
Disclosure
Recently, I made several gifts using the mason jars. I needed some end of the year teacher’s gifts. I purchased several containers of trail mix. The brightly colored M & M’s screamed: “Teacher Theme”. I used teacher themed cardstock and wrapped a strip around the jars.
I attached a strip of “School Days” Morex Bobbin Ribbon around the edge of the can lid. Next, I added a cardstock circle on top of the lid. I then finished the gift by adding “ABC” letter punches and an apple with a brown pipe-cleaner stem.
I held everything on the Mason Jars with my favorite adhesive: Glue Dots.

I filled the “Teacher Themed” Mason Jars with trail mix and then placed the heavy jars into wine bags that I decorated with a “Teacher Theme”, as well. The wine bags work great, they are the right size and are meant for holding heavy bottles.
![]() |
| Teacher's Appreciation Gift |
Links:
Getting Creative with Blank Cards
Gift Giving on a Budget - Teacher's Gift
Jar Crafts for Kids
Scrapbooking Supplies
Disclosure
April 15, 2010
Bottle Cap Barrettes
I love to recycle whenever I can. I think there is this thrill of knowing that you could take something that would have been otherwise trash and turn it into something wonderful.
I wanted to make my own unique barrette using a bottle cap. However, I didn’t want it to be a tradition bottle cap barrette where the bottle cap was decoupaged with an image and then hot glued onto the center of a bow. I wanted something new, unique, lasting, safe, and comfortable to put in my daughter’s hair.
Materials:
Bottle Cap
Alligator Clip
3/8” wide ribbon
Fiberfill
Hot Glue Gun
Small Swatch of Fabric
Instructions:
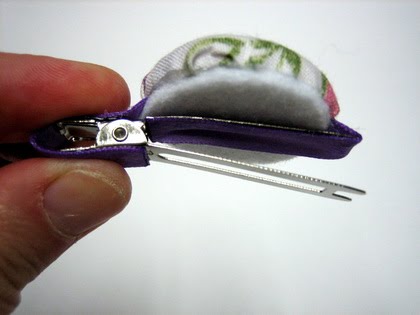
Begin by cutting 12” of 3/8” wide ribbon. Fold the ribbon in half, at the center crease mark hot glue it onto the top of the bottle cap. Bring the ribbon around the side and hot glue just along the edge.
Using a small amount of fiberfill lay it on top of the cap and along the edges. Helpful Hint: Hot glue along the edge of the bottle cap then place fiberfill on top.
Cut a fabric circle just large enough to fold the sides down into the bottle cap. Hot glue the sides of the fabric to the insides of the bottle cap; pinch, fold, and then hot glue. Hot glue the ribbon tails just to the side of the bottle cap.
The inside of the bottle cap doesn’t look so pretty, so to pretty it up fill the cap with fiberfill and then place a finishing circle of stiff felt held in place with hot glue.
Use the ribbon tails to hot glue the ribbon to the alligator clip, trim away excess ribbon.
There is a lot that you can do with this bottle cap barrette and I am really just getting started with it. I am thinking of sewing things on to the fabric, fun faces, little creatures, and other embellishments. I would love to see what you do with this craft. If you make any please link back so I can showcase your work to my readers.
For more of my barrette tutorials visit my Boutique Crafts and Gifts Directory
For more bottle cap crafts visit my tutorial: Recycle Craft: Buggy Mod Podge Bottle Caps
I wanted to make my own unique barrette using a bottle cap. However, I didn’t want it to be a tradition bottle cap barrette where the bottle cap was decoupaged with an image and then hot glued onto the center of a bow. I wanted something new, unique, lasting, safe, and comfortable to put in my daughter’s hair.
Materials:
Bottle Cap
Alligator Clip
3/8” wide ribbon
Fiberfill
Hot Glue Gun
Small Swatch of Fabric
Instructions:
Begin by cutting 12” of 3/8” wide ribbon. Fold the ribbon in half, at the center crease mark hot glue it onto the top of the bottle cap. Bring the ribbon around the side and hot glue just along the edge.
Using a small amount of fiberfill lay it on top of the cap and along the edges. Helpful Hint: Hot glue along the edge of the bottle cap then place fiberfill on top.
Cut a fabric circle just large enough to fold the sides down into the bottle cap. Hot glue the sides of the fabric to the insides of the bottle cap; pinch, fold, and then hot glue. Hot glue the ribbon tails just to the side of the bottle cap.
The inside of the bottle cap doesn’t look so pretty, so to pretty it up fill the cap with fiberfill and then place a finishing circle of stiff felt held in place with hot glue.
Use the ribbon tails to hot glue the ribbon to the alligator clip, trim away excess ribbon.
There is a lot that you can do with this bottle cap barrette and I am really just getting started with it. I am thinking of sewing things on to the fabric, fun faces, little creatures, and other embellishments. I would love to see what you do with this craft. If you make any please link back so I can showcase your work to my readers.
For more of my barrette tutorials visit my Boutique Crafts and Gifts Directory
For more bottle cap crafts visit my tutorial: Recycle Craft: Buggy Mod Podge Bottle Caps
April 14, 2010
Tropicana Decorative Planter
Check out the cool “Juicy Rewards Badge” on the right sidebar. That neat little badge means that Sewing and Crafting with Sarah was chosen to be a Juicy Rewards Insider Ambassador for Tropicana. Currently, Tropicana is offering codes on their juice cartons that then can be transferred into rewards and savings on, “Everything from golf and workout gear to waterpark and zoo admissions”. When visiting their rewards site there is a tag line that reads, “20,000 things to do with an empty juice carton”, the tag line is in reference to all there great savings programs (and they are great!).
However, I have decided to take the campaign a step further and create things with the empty cartons. For Easter I designed a fun woven ribbon Easter Basket from the Tropicana Carton. For Earth Day, I decided to create a small decorated planter using a recycled Tropicana Carton.
Materials:
• Empty, cleaned Tropicana Carton
• Saran Wrap
• Packing Tape
• DCWV The Glitter Mat Stack (Item# 318834 at AllCraftSupplies.com
)
• Yellow Tape (Electrical Tape)
• Glue Dots
Instructions:
Begin by cutting the Tropicana Carton 4” high.
Line the inside of the container with Saran Wrap and along the edges. Hold the Saran Wrap in place by taping it against the outside of the carton with packing tape.
Cut rectangular shapes of DCWV Glitter Scrapbooking Paper and using glue dots hold them in place along the sides of the carton.
Finish the all the edges of the container by attaching electrical tape along the edges (decorative tape or clear tape will work, as well).
Place rocks in the bottom of the pot for proper water drainage. Then insert plant and potting soil inside the decorative planter.
Planter makes a great home décor item and using the glitter scrapbooking paper adds an extra sparkle to a room!
If you also have a love for recycling and reusing; you can use a portion or all of your points towards “Rescue the Rainforest with Tropicana Rewards”. For every 3 points you donate 100 sq ft of the rainforest will be rescued. Click here to donate and see the great impact you, I, and many others have had on the preservation of the rainforest.
Reuse and Recycle,
Sarah Forhan
"I wrote this review while participating in the Tropicana Juicy Insiders Ambassador program by Mom Central on behalf of Tropicana. I received 12 free Juicy Rewards points and a $50 Visa gift card to use in redemption of the points and to facilitate my review."
However, I have decided to take the campaign a step further and create things with the empty cartons. For Easter I designed a fun woven ribbon Easter Basket from the Tropicana Carton. For Earth Day, I decided to create a small decorated planter using a recycled Tropicana Carton.
Materials:
• Empty, cleaned Tropicana Carton
• Saran Wrap
• Packing Tape
• DCWV The Glitter Mat Stack (Item# 318834 at AllCraftSupplies.com
• Yellow Tape (Electrical Tape)
• Glue Dots
Instructions:
Begin by cutting the Tropicana Carton 4” high.
Line the inside of the container with Saran Wrap and along the edges. Hold the Saran Wrap in place by taping it against the outside of the carton with packing tape.
Cut rectangular shapes of DCWV Glitter Scrapbooking Paper and using glue dots hold them in place along the sides of the carton.
Finish the all the edges of the container by attaching electrical tape along the edges (decorative tape or clear tape will work, as well).
Place rocks in the bottom of the pot for proper water drainage. Then insert plant and potting soil inside the decorative planter.
Planter makes a great home décor item and using the glitter scrapbooking paper adds an extra sparkle to a room!
If you also have a love for recycling and reusing; you can use a portion or all of your points towards “Rescue the Rainforest with Tropicana Rewards”. For every 3 points you donate 100 sq ft of the rainforest will be rescued. Click here to donate and see the great impact you, I, and many others have had on the preservation of the rainforest.
Reuse and Recycle,
Sarah Forhan
"I wrote this review while participating in the Tropicana Juicy Insiders Ambassador program by Mom Central on behalf of Tropicana. I received 12 free Juicy Rewards points and a $50 Visa gift card to use in redemption of the points and to facilitate my review."
Labels:
Earth Day,
Mother's Day,
Product Review,
Recycling Crafts,
Spring
April 12, 2010
Pounded Flowers Artwork
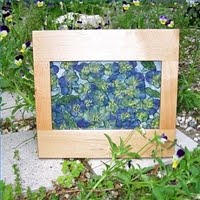
Keeping with my Earth Day theme; art made using flowers. I pounded Johnny Jump-Up flowers to create my spring canvas. I used fabric stabilizer as my canvas because it thin like paper but far more durable. The fabric stabilizer also allows the petal colors to come through without bleeding and running all over the fabric.
You can experiment with other fabrics such as white cotton or white muslin. For me though, the fabric stabilizer works best for purposes of a canvas.
Fabric stabilizer can be found at AllCraftSupplies.com
The product name is: Totally Stable Iron On Tear Away Stabilizer 20X36, Item 101345. The description of the stabilizer is to: Eliminate the annoying shifting sliding and puckering of material. Excess then tears away easily. For appliqué, decorative stitching, buttonholes, delicate fabrics, and quilt templates.
Materials Needed:
Fabric Stabilizer
Hammer
Flowers
Fine Acrylic Marker
Packing Tape
Instructions:
Find interesting flowers and green leaves that you like.
Place the flowers bloom side down against the fabric stabilizer. Add some leaves and arrange it randomly or in whatever pattern you like.
Tape the flowers down using packing tape.
Turn the stabilizer over and begin to hammer it. The flowers colors will start to come to the surface of the fabric as you hammer.
Once hammering is complete remove tape and brush away the flowers and leaves. Then outline flower print with a fine tip acrylic marker. Use additional acrylic markers for shadowing if necessary.
Frame artwork.

Disclosure
You can experiment with other fabrics such as white cotton or white muslin. For me though, the fabric stabilizer works best for purposes of a canvas.
Fabric stabilizer can be found at AllCraftSupplies.com
The product name is: Totally Stable Iron On Tear Away Stabilizer 20X36, Item 101345. The description of the stabilizer is to: Eliminate the annoying shifting sliding and puckering of material. Excess then tears away easily. For appliqué, decorative stitching, buttonholes, delicate fabrics, and quilt templates.
Materials Needed:
Fabric Stabilizer
Hammer
Flowers
Fine Acrylic Marker
Packing Tape
Instructions:
Find interesting flowers and green leaves that you like.
Place the flowers bloom side down against the fabric stabilizer. Add some leaves and arrange it randomly or in whatever pattern you like.
Tape the flowers down using packing tape.
Turn the stabilizer over and begin to hammer it. The flowers colors will start to come to the surface of the fabric as you hammer.
Once hammering is complete remove tape and brush away the flowers and leaves. Then outline flower print with a fine tip acrylic marker. Use additional acrylic markers for shadowing if necessary.
Frame artwork.
Disclosure
April 9, 2010
Earth Day Ribbon Windsock Ovaltine Container Part 2
Today, is Part Two of recycling an Ovaltine Container. Yesterday, I removed the tin from the bottom of the container for punch tin art.
The remainder of the Ovaltine container will be used today for a fun decorative ribbon windsock. The windsock can be hung in a room or outside on a porch for a spring flair. The wind will twirl and blow the ribbon tails.
Materials:
Small Ovaltine® Container
Curling Ribbon (Variety of Colors)
Glue Gun (or Glue Dots)
Hole Puncher
Instructions:
1. Wash the inside of the Ovaltine Container and remove the label.
2. Using scissors trim the bottom of the Ovaltine container evenly, the end that you cut the tin bottom from. This step may or may not be necessary depending how cleanly you cut the tin off the bottom for the previous craft.
3. Hole punch the sides of the container and attach curling ribbon to use as the hanger.
4. Glue ribbon along the sides of the container spaced a half inch apart. Leave strands of curling ribbon hanging at the bottom.
5. Hot glue the strands of curling ribbon along the bottom edge of the windsock.
6. Weave strands of curling ribbon along the sides of the windsock about an inch apart. Hot glue the curling ribbon at the start and end of each row.
7. Hang the windsock.

The remainder of the Ovaltine container will be used today for a fun decorative ribbon windsock. The windsock can be hung in a room or outside on a porch for a spring flair. The wind will twirl and blow the ribbon tails.
Materials:
Small Ovaltine® Container
Curling Ribbon (Variety of Colors)
Glue Gun (or Glue Dots)
Hole Puncher
Instructions:
1. Wash the inside of the Ovaltine Container and remove the label.
2. Using scissors trim the bottom of the Ovaltine container evenly, the end that you cut the tin bottom from. This step may or may not be necessary depending how cleanly you cut the tin off the bottom for the previous craft.
3. Hole punch the sides of the container and attach curling ribbon to use as the hanger.
4. Glue ribbon along the sides of the container spaced a half inch apart. Leave strands of curling ribbon hanging at the bottom.
5. Hot glue the strands of curling ribbon along the bottom edge of the windsock.
6. Weave strands of curling ribbon along the sides of the windsock about an inch apart. Hot glue the curling ribbon at the start and end of each row.
7. Hang the windsock.
Subscribe to:
Posts (Atom)


.jpg)