I love using recycled materials to make crafts - and I don't limit re-purposing to Earth Day. However, Earth Day is a great excuse to showcase my recycling crafty talents.
Did you know that it only takes one twin bed-sheet to make a scrap fabric wreath? True! I used every bit of the fabric but I was able to make a full fabric wreath with one twin bed-sheet.
Here is another little tip - Always use a sheet that is printed on both sides. This way your wreath is uniform in color.
I cut my fabric 3" wide by 7" long. The result was chunky fun spring style wreath!
Visit the Bowdabra Blog for the full tutorial and all the deets for making a pretty bow to compliment your scrap fabric wreath.
An online journal of all my sewing, crafting, and hair bow making adventures!
Showing posts with label Fabric Crafts. Show all posts
April 8, 2013
March 15, 2013
How to Make Wired Fabric Ribbon Craft Tutorial
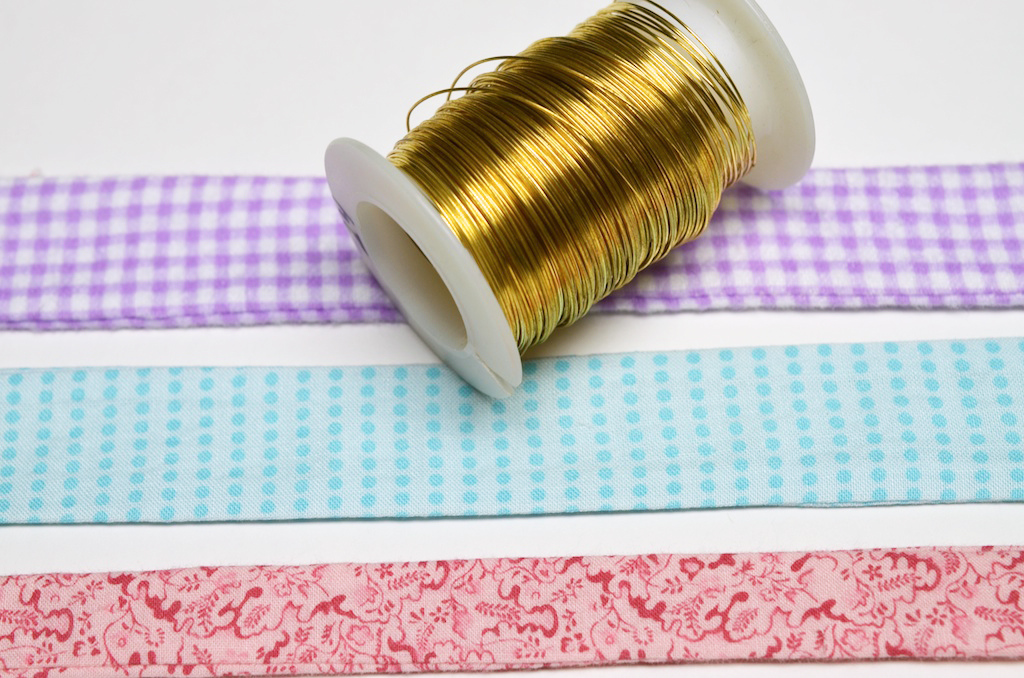
I have lots of scrap fabric and I am always looking for creative ways to use it! Follow my craft tutorial to make your own wired fabric ribbon! I made the fabric ribbon double sided and added 24 gauge wire so that it would easily hold its shape.
Materials Needed:
Strips of Assorted Fabric
24 Gauge Wire
Wire Cutters
Scissors
Sewing Machine
Matching Thread
Pins
Instructions:
1. Begin by cutting strips of fabric. I cut my fabric 22" long and varied the width from 1" to 1.5" wide.
-->
Materials Needed:
Strips of Assorted Fabric
24 Gauge Wire
Wire Cutters
Scissors
Sewing Machine
Matching Thread
Pins
Instructions:
1. Begin by cutting strips of fabric. I cut my fabric 22" long and varied the width from 1" to 1.5" wide.
2. Sew each strip of fabric together (right sides facing each other) leaving the ends open. Turn the fabric right side out. Next, cut 2 matching 24 gauge wires 2" longer than you will need.
3. Bend the end of the wire so that it doesn't snag on the fabric. Place the wire through the fabric.
4. Place the wire along the edge of the fabric. Sew a hem to keep the wire in place. Go slowly, you could possibly break your sewing needle if you sew on the wire.
5. Add wire to the other side of the fabric. Sew a hem on the other side. Then trim away excess wire and fold the fabric ends. Hem the ends, as well.
6. Follow the instructions to make several wired fabric ribbons.
-->
January 7, 2013
Cute Hair Accessories Denim Fabric Rosette
Really who doesn't love to make cute hair accessories? Follow my step-by-step tutorial for making a denim fabric rosette. The rosette, inspired by the Chou Rose, is perfect for both little girls and women hair clips.
This floral hair accessory is easy to make using a muslin fabric base and denim bias tape. Make several denim fabric rosettes and use them on hair clips, headbands, scrapbooking, or gift wrapping.
1. Begin by cutting a circle 2.25" in diameter muslin circle - mark the center.
2. Make a cut along the line to the center. Fold the material to form a cone shape. Quickly stitch the material in place. The stitches don't have to be perfect, no one will see it.
3. Whip-stitch the end of the denim bias tape, so that it will not fray. Sew the bias tape, in place, over the tip of the cone.
4. Fold the bias tape and tack in place.
5. Continue to fold the bias tape and tack it in place. The most important thing when tacking it in place is that you are going through the previous layer of denim.
6. Notice the sewing needle in the picture below - it is going through the previous layer of denim.
7. Continue folding and tacking layers until you have gone completely around the muslin fabric. Trim the bias tape from the cardboard spool.
8. Fold the tail to the back of the fabric rosette and tack it to place. Then whip-stitch the end of the denim tail to keep it from fraying. The underneath of the rosette isn't pretty, if you want to cover your stitches - you can glue felt onto the back.
9. Your cute denim fabric rosette hair accessory is complete! Follow the instructions to make several rosettes.
For more fabric hair accessories visit my other tutorials:
Pointed Petal Fabric Flower
DIY Fabric Flowers
Small Fabric Flowers
Bandanna Rag Bow
-->
This floral hair accessory is easy to make using a muslin fabric base and denim bias tape. Make several denim fabric rosettes and use them on hair clips, headbands, scrapbooking, or gift wrapping.
Materials Needed:
- Denim Bias Tape (Double Fold)
- Muslin
- Embroidery Thread
- Sewing Needle
1. Begin by cutting a circle 2.25" in diameter muslin circle - mark the center.
2. Make a cut along the line to the center. Fold the material to form a cone shape. Quickly stitch the material in place. The stitches don't have to be perfect, no one will see it.
3. Whip-stitch the end of the denim bias tape, so that it will not fray. Sew the bias tape, in place, over the tip of the cone.
4. Fold the bias tape and tack in place.
5. Continue to fold the bias tape and tack it in place. The most important thing when tacking it in place is that you are going through the previous layer of denim.
6. Notice the sewing needle in the picture below - it is going through the previous layer of denim.
7. Continue folding and tacking layers until you have gone completely around the muslin fabric. Trim the bias tape from the cardboard spool.
8. Fold the tail to the back of the fabric rosette and tack it to place. Then whip-stitch the end of the denim tail to keep it from fraying. The underneath of the rosette isn't pretty, if you want to cover your stitches - you can glue felt onto the back.
9. Your cute denim fabric rosette hair accessory is complete! Follow the instructions to make several rosettes.
For more fabric hair accessories visit my other tutorials:
Pointed Petal Fabric Flower
DIY Fabric Flowers
Small Fabric Flowers
Bandanna Rag Bow
-->
November 13, 2012
Pointed Petal Fabric Flower Tutorial
Follow my DIY tutorial to make a large pointed petal fabric flower. I chose red fabric specifically to make a Christmas style fabric bow, but any color fabric would be fun.
I have been working with bias tape to make small fabric flowers with pointed petals and small fabric flowers with round petals.
To make this fabric flower I chose double fold quilt binding. The quilt binding is just like bias tape except it is wider.
Materials Needed: (Flower is 3.5" wide)
1. Begin by folding the quilt binding down to form a triangle. Tuck the cut/frayed end into the triangle and whip-stitched closed.
2. Fold the quilt binding to form another triangle on the left. Keep the binding close but not overlapping.
4. Fold the material to form another triangle on the right.
5. Fold the right side in to the left. Knot the point in place. You just made your first full pointed petal.
6. Fold the material to form a triangle at the bottom.
7. Fold the material up and knot in place.
8. Fold the material to form a triangle on the right.
9. Fold the material in and knot to make your second full pointed petal.
10. Follow the instructions 6 - 9 to continue to make petals.
11. Make a total of 20 full petals. Finish the end petal just as the first, form a triangle fold in the frayed end and whip-stitch in place.
12. Sew the beginning petal and the ending petal together to form the final 21st petal.
13. Cover the large flower opening with a button, gem, or bottle cap. Hot glue it in place.
-->
I have been working with bias tape to make small fabric flowers with pointed petals and small fabric flowers with round petals.
To make this fabric flower I chose double fold quilt binding. The quilt binding is just like bias tape except it is wider.
Materials Needed: (Flower is 3.5" wide)
- approx. 1.5yds Double Fold Quilt Binding
- Coordinating Thread
- Large Button, Gem, Bottle Cap
- Hot Glue
1. Begin by folding the quilt binding down to form a triangle. Tuck the cut/frayed end into the triangle and whip-stitched closed.
2. Fold the quilt binding to form another triangle on the left. Keep the binding close but not overlapping.
3. Fold the triangle in and knot at the left.
4. Fold the material to form another triangle on the right.
5. Fold the right side in to the left. Knot the point in place. You just made your first full pointed petal.
6. Fold the material to form a triangle at the bottom.
7. Fold the material up and knot in place.
8. Fold the material to form a triangle on the right.
9. Fold the material in and knot to make your second full pointed petal.
10. Follow the instructions 6 - 9 to continue to make petals.
11. Make a total of 20 full petals. Finish the end petal just as the first, form a triangle fold in the frayed end and whip-stitch in place.
12. Sew the beginning petal and the ending petal together to form the final 21st petal.
13. Cover the large flower opening with a button, gem, or bottle cap. Hot glue it in place.
14. Attach the large fabric flower to a hair clip, headband, use as a brooch, or decorate a gift with the large pointed petal fabric flower.
-->
November 6, 2012
DIY Fabric Flowers Tutorial
I have been working on making a collection of fabric flower tutorials using bias tape. Fabric flowers have a variety of uses: clothing embellishments, bobby pins, hair clips, card-making, and scrapbooking. This DIY tutorial shows you how to make flowers that are 1.75" wide. Make several flowers in coordinating colors for a beautiful arrangement.
Materials Needed:
17" of Double Wide Bias Tape (For the Flower)
5" of Double Wide Bias Tape (For the Flower's Center)
Matching Thread
Seamstress Tape
Instructions:
1. Begin by cutting 17" of double wide bias tape. Whip-stitch the end of the bias tape to keep it from fraying. In my previous flower tutorial, I used Dritz Fray Check, Fray Check will work but it makes the fabric a little stiff when sewing.
2. Position the bias tape so that the opening is on the bottom. Fold down the top to form a triangle, leave a small tail. Knot the end of the point of the triangle.
3. Fold down the other side. Keep the material close together but not overlapping.
4. Fold the left triangle in and knot it in place.
5. To make your next petal fold the bottom to form a triangle.
6. Fold the triangle up.
7. Fold down the other side. Keep the material close together but not overlapping.
8. Fold the left triangle in and knot them together.
9. Make a total of 13 petals. Trim away extra bias tape and whip-stitch the end.
10. Turn the flower over and stitch the two tails together.
11. Next, close to the center of the flower stitch the petals together.
12. To create the flower petals - fold the point of the flower down to the back of the flower and stitch in place.
13. Next, run the stitch over to the material in between of the petals.
14. Move to the next petal, fold it down, stitch in place, and then between the petals.
15. Continue stitching so that all 13 petals are folded down and tacked in place.
16. To make the center of the flower cut 5" of bias tape. Loosely twist the bias tape.
17. Knot the bias tape in the center.
18. Place the knot with tails inside of the flower, sew it in place.
19. Trim away excess tails and whip-stitch the ends to keep it from fraying.
20. Follow the instructions to make several flowers and bunch them together.
-->
Materials Needed:
17" of Double Wide Bias Tape (For the Flower)
5" of Double Wide Bias Tape (For the Flower's Center)
Matching Thread
Seamstress Tape
Instructions:
1. Begin by cutting 17" of double wide bias tape. Whip-stitch the end of the bias tape to keep it from fraying. In my previous flower tutorial, I used Dritz Fray Check, Fray Check will work but it makes the fabric a little stiff when sewing.
2. Position the bias tape so that the opening is on the bottom. Fold down the top to form a triangle, leave a small tail. Knot the end of the point of the triangle.
3. Fold down the other side. Keep the material close together but not overlapping.
4. Fold the left triangle in and knot it in place.
5. To make your next petal fold the bottom to form a triangle.
6. Fold the triangle up.
7. Fold down the other side. Keep the material close together but not overlapping.
8. Fold the left triangle in and knot them together.
9. Make a total of 13 petals. Trim away extra bias tape and whip-stitch the end.
10. Turn the flower over and stitch the two tails together.
11. Next, close to the center of the flower stitch the petals together.
12. To create the flower petals - fold the point of the flower down to the back of the flower and stitch in place.
13. Next, run the stitch over to the material in between of the petals.
14. Move to the next petal, fold it down, stitch in place, and then between the petals.
15. Continue stitching so that all 13 petals are folded down and tacked in place.
16. To make the center of the flower cut 5" of bias tape. Loosely twist the bias tape.
17. Knot the bias tape in the center.
18. Place the knot with tails inside of the flower, sew it in place.
19. Trim away excess tails and whip-stitch the ends to keep it from fraying.
20. Follow the instructions to make several flowers and bunch them together.
-->
Subscribe to:
Posts (Atom)
.jpg)


.jpg)
.jpg)
.jpg)
.jpg)