Showing posts with label Christmas. Show all posts

December 17, 2012

Beaded Christmas Ornament Tutorial

This weekend, I worked on handmade Christmas gifts.   I made a beaded Christmas ornament using craft materials that I purchased at Michael's Craft Store.  To make these beaded ornaments I used a 3" Styrofoam ball, straight pins, and assorted beads.  It was not difficult to make this style ornament - just very time consuming.  This one ornament took me about four hours to make.


Materials Needed:
Mini Bowdabra
Hair Bow Tool & Ruler
Bowdabra Bow Wire
3/8" Silver Ribbon
Straight Pins
Assorted Beads
Seed Beads
3" Styrofoam Ball
(Links direct you to the Bowdabra Ribbon & Things Store)

Instructions:
1. Begin by gathering all the materials that you will need to make this ornament.


2. To make the ornament place a seed bead onto the the straight pin (this will keep the beads from coming off) then add a bead.  Continue placing beads all around the Styrofoam ball.


3. Next, make the bow for the top of the ornament.   You can either make the bow by hand or use the Mini Bowdabra and Hair Bow Tool & Ruler to make it.   I cut 20" of ribbon to make 4 (2" loops) with tails.


4. Attach the bow to the top of the ornament using several pins to hold it on place.  Use the remaining Bowdabra Bow Wire to hang the ornament.


5. Hang the ornament on your tree or give as a gift.

December 11, 2012

Deck the Halls a Country Living Book Review

Deck the Halls, a Country Living book, is full of Christmas crafts, decorations, gift ideas, and punch-outs to add style to your handmade gifts.  The punch-outs include Christmas note cards, sticker gift labels, gift tags, ornaments, small little gift boxes, and so much more!


I was very excited to receive this book to review!  I love (and I mean LOVE) craft books that have an extra fun "twist".  The "twist" with this book is that there are loads of punch-outs.  I was going to use my Cricut to make my own gift tags but after receiving this book I plan to use these:


And these:


During the holidays I usually make several gift baskets.  Holiday gift baskets are perfect for teachers, co-workers, and friends.  I often mix both store bought and homemade baked goodies.  The book provides little gift box punch outs that are the perfect fit for chocolate bars.  I bought several chocolate bars that I plan to wrap with these little gift boxes and add to them to my holiday gift baskets.


If you love punch-outs like I do; you will love this book! Beyond the gift tags, gift labels, gift boxes that I have already shown.  There are recipe cards, napkin holders, gingerbread patterns, wildlife stencils, Santa disguises, skeleton keys, place setting cards, I.O.U coupons, poinsettias, bird ornaments, and so much more.  Here is a picture of the bird ornaments.  I am not sure if I will use them as ornaments but I adore the birds.


Book: Country Living Deck the Halls (October 2012, Hearst, 9781588169235)

About the Author:  Author Katy McColl is the former Executive Editor of O at Home and Country Living.  Her work has appeared in the New York Times, Travel & Leisure, CBS Moneywatch.com, Best Life, Page Six Magazine,, Blueprint, InStyle Home, and other publications.

Disclosure: I received the book Deck the Halls free, in exchange for my honest opinion of the book.  My thoughts and opinions of the book are my own.

December 10, 2012

The Farm Chicks Christmas Book Review

County Living book "The Farm Chicks Christmas", is chock full of merry ideas for the holidays!


I often find craft inspiration reading DIY style craft books.  Sometimes, DIY books are pages of step-by-step craft tutorials but rarely are you allowed a glimpse into the crafty life of the author. NOT this book, author, Serena Thompson, shares photos of her family and friends. The book is also full of cute little stories; like her husband Colin trying to start a tree farm only to have squirrels take it over, a super sweet story of when Serena was a child - and her Christmas wish, along with amazing pictures and sneak peeks into Serena's home and her friends' homes during the holidays.

To my surprise this holiday book not only has some amazing craft ideas but also delicious recipes. Coincidentally, my daughter just asked the other day if we could bake some holiday cookies. "Cookies that are new that we have never made before." Hmm...I wasn't so sure until I saw all these great recipes. The raspberry thumbprints and the dark chocolate mint cookies are perfect! Best of all, BONUS in the back of the book, there are adorable little sticker gift tags that read, "Baked for you by", and cut-out little recipe cards.

This Christmas, I am giving several gift cards and certificates but I didn't want to use the little paper holders. There is great instructions for making a felt gift card holder held closed with fabric covered buttons.  I also loved a tree decorated by Serena's friend Teri. Teri made pom pom snowballs and decorated her entire tree with them. It turned out amazing. I think a miniature tree with snowball pom poms would look adorable in my home, this holiday.

Book: The Farm Chicks Christmas (September 2012, Hearst, 9781588169730)

More about the author: Serena Thompson runs The Farm Chicks Antique Show, in Spokane, WA; maintains a website and blog where she shares Farm Chick Style, a line of jewelry, clothing, and stationery items; and is a contributing editor to Country Living.  

Disclosure: I received The Farm Chick Christmas book free in exchange for my honest opinion of the book. My thoughts and opinions of the book are my own.

December 21, 2011

Christmas Ribbon Flower Ornament Tutorial

I made a Christmas Ribbon Flower Ornament that was showcased on Crafts Unleashed.  I am a designer for Crafts Unleashed and we are having an ornament challenge with all the designers participating.

I welcome you to visit Crafts Unleashed and vote for your favorite ornament.  By voting for your favorite ornament you are entered into a giveaway.   The giveaway is for a prize pack valued at $100.00. The contest ends 12/27 at 9am Est.  So head on over and vote!

Here is the ornament I submitted for the challenge.  I thought as an extra bonus I would give a detailed tutorial to my readers on how I made it.


Materials Needed to Make a Christmas Ribbon Flower Ornament:
  • 2902-101 Poly Satin Ribbon-White-1 3/8 inch
  • 2902-120 Poly Satin Ribbon-Holiday Green-2.5 inch
  • 2902-106 Poly Satin Ribbon-Red-5/8 inch
  • BOW3050 Bowdabra gold wire 100 yard value pack
  • 02PFS-21-P White Pearl Stamen
  • Thread
  • Sewing Needle
  • Hot Glue Gun
Instructions:

1. Begin with spools of poly satin ribbon.


2. Next, cut three strips of wide green ribbon 8" long.  Fold the ribbon at the half way mark to create a point.  Fold the ribbon again to make the leaf.  Use thread to hold the ends of the leaf together.

3. To make the white ribbon petals cut several strips 5" long.  Fold the ribbon in the same manner to create ribbon petals.  Hold the ends of the ribbon together with thread.


4. Sew all the ends of the petals together to form the flower base.


5. Stitch the green leaves onto the back of the flower base.


6. To create the red ribbon center cut 5" strips and dovetail the ends. Use a running stitch to hold the strips together.

7. Pull the thread and tie it at the center.


8. Add white pearl stamens to the flower center by wrapping the left over thread around them.  Knot the thread and trim away excess.


9. Sew the flower center to the base.

10. Bowdabra Bow Wire works awesome to hang Christmas ornaments.  I hot glued the wire to the back of the ornament and then finished the ornament with a circle cut out from the green poly-satin ribbon.

11. Your Christmas Ribbon Flower Ornament is complete and ready to be hung on the tree.


Please head on over to Crafts Unleashed and vote for your favorite ornament.  If my ornament is not your favorite - How about Paul's (my Dad) painted wooden ornaments?  So cute!


November 20, 2011

How to Make Clementine Christmas Ornaments


If you follow my blog you know that I love using fruit when crafting.  Fruit rocks!  It comes in a gorgeous array of colors and it always smells amazing.  Create these easy to make Clementine ornaments that can be hung on the tree and then later eaten.

Materials Needed:

Instructions:
1. Begin with clementines and Glue Dots® Minis.

2. Using two strands of ribbon tie it around the clementine.  Trim away excess ribbon.  Do this to both clementines.

3. Add another strand of ribbon to the top to hang the clementine ornament.  Use Glue Dots® Minis to add sequins to the ribbon.

4. Create a holiday bow using the Mini Bowdabra and Hair Bow Tool & Ruler.

5. Attach the bow to the clementine ornament using the Bowdabra Wire.  Spiral the remaining wire to create fun ringlets.

6. Make a matching bow for the other clementine.

7. Hang the clementine ornaments on the Christmas tree or a holiday wreath.


www.gluedots.com/glue


- I wrote this blog post while participating on the Glue Dots® design team.

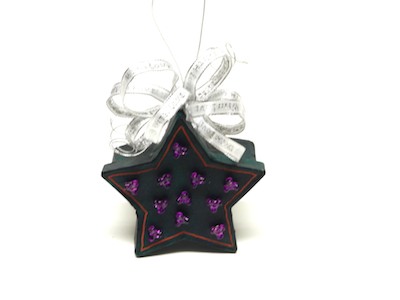
Homemade Star Christmas Tree Ornaments


Design these easy to make Christmas tree star ornaments.  The ornaments are really simple to make and are a perfect craft to get the entire family involved in.  I used paper mache star boxes to make these ornaments.  Add a small gift inside of the ornament and give them as a gift or make 25 little star ornaments and use them as a count down till Christmas.  Each day children can open a different star box and till Christmas morning.

Materials Needed:
·       Glue Dots Minis®
·       Paper Mache Box
·       Acrylic Paints
·       3/8" Wire Ribbon
·       Mini Bowdabra®
·       Hair Bow Tool & Ruler®
·       Bowdabra Bow Wire®
·       Plastic Beads with flat backs
·       Paint Pen
·       Yarn Needle

Instructions:
1.     First, paint the small paper mache star boxes.

2.     Once the boxes are dry use a yarn needle attach Bowdabra Bow Wire to the small star boxes.

3.     Decorate the front of the star boxes with paint pens.

4.     Next, collect Mini Glue Dots and plastic beads with flat backs.

5.     Attach the beads to the star ornament using the Mini Glue Dots.

6.     Create a Mini Bowdabra bows for the ornaments using the Mini Bowdabra and Hair Bow Tool & Ruler.

7.     Attach the bow to the ornament using the Bowdabra Bow Wire.  Spiral the remaining wire for fun ringlets.

8.     Make a bow for each ornament.

9.     Hang ornaments on the Christmas tree or on a wreath.


www.gluedots.com/glue


- I wrote this blog post while participating on the Glue Dots® design team.

December 29, 2010

Christmas Card Ball Ornaments

What to do with the Christmas Cards now that the holidays are over?  Instead of throwing away the Christmas Cards or storing them; why not make them into Christmas Tree Ornaments.  During Christmas Break I am always looking for ways to keep my children occupied.  This craft is perfect to do before the tree is taken down the ornaments are stored away.  Make the ornaments now and then in a week when the tree is down the Christmas Card Ball Ornaments can be neatly put away with the other ornaments. 

My children and I have made these ornaments several years in a row and there is a lot of instructions on the web.  However, the easiest to follow instructions for this craft (with step-by-step pictures instructions) is here at InkSpired Creations.

I prefer to make the ornaments really large just because it easier for my children to work with them.  However, the great thing about this pattern is you can make them as large or as small as you want.  We used ribbon in the center, as well as, adding a few charms and beads at the bottom.  The kids also have fun adding little charms along the edges where the cards meet.


 Post written by Sarah Forhan, Craft Designer

November 17, 2010

Handmade Beaded Christmas Ornaments

Time to get creative! I love Christmas Ornaments, I love how they twinkle, sparkle, and shine. I love that each ornament has a history and a story. I cherish the holiday ornaments that are handmade; with each ornament that is placed on the tree I think back to the time I made it or a time when my children and I made them.

It was because of my love for handmade Christmas Ornaments that I designed step-by-step instructions for making five gorgeous holiday ornaments using “Ribbon to Bead” by Morex. I added an accent bow to each of the ornaments using the Mini Bowdabra and Ruler.

I am pleased to announce that step-by-step instructions are available for download at Bowdabra’s Ribbon & Things Craft Store. As a designer, I am thrilled that you as the customer can first download the instructions free of charge and then after reading the instructions order the holiday ornament kits! Bowdabra’s outstanding integrity and high level of customer service is just one of the reasons why I love designing for them! 

Click on the ornament's pictures for kit pricing and free instructions.


Follow on Twitter @sarah_forhan
Sewing & Crafting with Sarah on Facebook

Disclosure

Email Updates Daily by Feedburner

Enter your email address:

Delivered by FeedBurner