Showing posts with label beaded crafts. Show all posts

February 14, 2014

Mardi Gras Bead Craft Ideas

What to do with all those Mardi Gras beads.  During this time of year they are a party staple.  You can find them at craft stores and discount stores CHEAP.  I love Mardi Gras beads because they come in so many pretty colors and they are super inexpensive.  Here are some great craft ideas!


Make these fun curtains using ribbon to hold all the beads together.
Pin Source: http://www.pinterest.com/pin/207165651581077558/


Chic Beaded Frame


Decorate Bottles with the Beads
Pin Source: http://www.pinterest.com/pin/103371753917981449/


Grab a canvas and make some art!


Mardi Gras Ribbon Wrapped Bangles


Votives Wrapped in Mardi Gras Beads


Melted Mardi Gras Bead Suncatchers


Mardi Gras Beaded Headbands


February 11, 2014

Ribbon Wrapped Bead Headbands Tutorial

Turn boring plastic headbands into gorgeous ribbon wrapped beaded headbands in no time!  Using materials I purchased at the Dollar Store I was able to make expensive looking boutique style headbands.  Please follow my tutorial below to learn how to make them.  For more information about using Mardi Gras beads and ribbon, in crafts, view my beaded Mardi Gras bangles bracelets.


I purchased at the Dollar Store some Mardi Gras beads, some thin headbands, a long candle lighter, and thin width sheer ribbon.


Next, to make the headbands I knotted the ribbon around the third bead.


Heat seal the end of the ribbon and place it under the headband and press it against the back.  When you heat seal sheer ribbon it melts and is sticky.  Wrap the ribbon down to the end of the bead and then back up all around the headband.


Continue wrapping the ribbon all the way to the other side and then back again to where you started - at the original knot.  Heat seal the ribbon and press it against the other ribbons to hold it all in place.  Use the lighter to trim away the string at the very end of the first beads, as well.  Use extra caution always when using the lighter.


Your ribbon and bead headband is complete!


Follow the instructions to make several!

September 13, 2011

Multi-Ribbon Strand Necklace

I have been designing ribbon and bead jewelry using a new product called Ribbon-to-Bead.  The ribbon comes with a wire needle already attached which makes adding beads to the ribbon super easy!


Visit the Bowdabra Blog to learn how to make a Multi-Ribbon Strand Necklace and order Ribbon-to-Bead.


September 7, 2011

Miniature Beaded Fall Wreath Tutorial

Create a miniature beaded fall wreath perfect to display on a dollhouse or to be used as a brooch.  I designed the beaded fall wreath using a large earring hoop, beads, alphabet beads, and 24 gauge jewelry wire.  - Because I used 24 gauge wire it is really easy to bend and manipulate the wire.  The key to this simple project is all in the gauge of the wire.  A lower gauge wire would make this project a lot harder. 


Visit Crafts Unleashed for my full tutorial.  - Change beading color to match the season.

September 5, 2011

Beaded Ribbon Necklace

You know when you make something that you just can stop looking at!?  That craft that instantly because your new favorite craft, ever!  Until, the next new favorite craft....

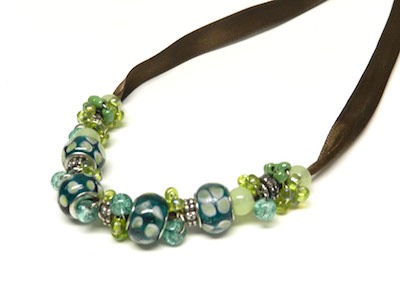
My favorite craft right now is a Beaded Ribbon Necklace I made for the Bowdabra Blog to showcase their new Ribbon-to-Bead line!  The ribbon-to-bead has a wire needle attached to make beading super easy.

Isn't it so pretty!!  Visit the Bowdabra Blog for the full tutorial.


Sign-up for their Bowdabra Newsletter and they will provide you with a coupon code to purchase this Designer Beaded Ribbon as a Buy One, Get One FREE! Simple sign-up for the newsletter with a valid email address and they will provide you with a coupon code – no limits or exclusions.
Click to go to their newsletter sign-up page.

June 29, 2011

Made by Me Wooden Beading Loom Review

Recently, I created a woven beaded bracelet using Darice's Beading Loom.  I had so much fun using the beading loom!  You can see my finished bracelet along with read my experiences of beading weaving, for the first time, at: Crafts Unleashed.  I had so much fun weaving that I thought if I could find a children's beading loom kit that my 8yr old daughter would really enjoy it, as well.

The Made by Me Wooden Beading Loom Kit comes with the loom, 12 packages of seed beads, 2 beading needles, 6 jump rings, 1 spool of beading thread, 4 metal clasps, 2 spools of elastic cords, and 1 key ring. 


It was a very impressive kit and my daughter was super excited to start to weave beads just as I had done a few weeks ago. 

We added the strings on to the loom according to the detailed instructions. 


I loved the concept of using the springs as spacers for the thread, I also loved that the wooden dowels on the end could make the thread tighter as you went.  The hardest part for me when I was weaving is that eventually your thread loses tension and weaving becomes difficult.  This kit allows you to move the dowels on the end to keep tension on the thread at all times; making weaving so much easier!

Here is my daughters finished bracelet; red, white, and blue themed woven bead bracelet.  She is so proud of her final bracelet and that she could weave it all by herself. 


I finished the bracelet for my daughter by tying the ends together and adding the finishing hardware.  Lastly, just to be safe I added an extra strand of thread through each of the bead rows (shh..though we won't tell her that).

Disclosure: I bought the Made by Me Bead Weaving Loom and was not compensated in any way for my review. 

March 31, 2010

Last Day of National Craft Month - And boy do I have big news!

Hard to believe it is the end of March and the last day of National Craft Month. Where did March go? Today is also the last day of my 3-day tutorial on decorating eggs. Visit my final tutorial on eggs at Crafts Unleashed: Hanging Beaded Eggs. I had so much fun making these eggs I hope I inspired you to make your own.

While at Crafts Unleashed visit there awesome giveaway. This giveaway is the giveaway of all giveaways! I am so excited about this great giveaway I can’t stop saying “giveaway”. That is right people it is a giveaway!

So head on over to Crafts Unleashed give me some bloggy love and visit my Hanging Beaded Eggs tutorial and then hop on over to the giveaway and enter for a chance to win.

I can’t enter because I write for them but the next best thing would be for me to see one of my readers win!

March 30, 2010

Decorating Eggs with Beads

I am very excited today is part two of my three part series on dying, blowing, and decorating eggs.  Today is all about adding beads to your eggs.  Visit me at Crafts Unleashed for my step-by-step tutorial with pictures on how to decorate the eggs with beads.

The tutorial includes a materials list which is conveniently linked to Consumer Crafts so that you can order your supplies easily. 

These eggs are not just for Easter but make the perfect spring home decoration.  Love, love, love the little nests these eggs sit in!

Become a fan of Consumer Crafts on Facebook for their latest updates.

March 8, 2010

Spring No Sew Purse

I love ribbon and the look of woven ribbon. This stiff floral ribbon is very easy to work with and makes the perfect spring purse. Below is the step-by-step tutorial including pictures.


Materials Needed:
Spring Ribbon 2 Different Styles
Spring Colored Beads
Curling Ribbon
Hot Glue Gun

Instructions:
1. Begin by cutting the two floral ribbon spools into 8" strips. You will need 12 strips of one style and 10 strips of the other style.


2. Lay 6 strips of the same style closely together. Then begin to weave 5 of the other floral strips back and forth between the 6 floral strips.


3. Use hot glue to hold your woven rectangle together.
4. Following the above steps to make another rectangle.
5. Fold a hem at the top of each rectangle and adhere it with hot glue.


6. Cut a 24" piece of curling ribbon and knot the end of it. Thread "Spring" colored beads onto the curling ribbon and knot the other end.


7. Using a hot glue gun, glue the beaded handle to the front of one of the rectangles.
8. Next, place the two rectangular ribbons pieces print-side to print-side. Use hot glue like a seam and run a thin straight bead of glue along the sides and the bottom of the purse.
9. Wait at least 10 minutes so that glue is thoroughly dried and then turn the purse inside out.


Visit some of my other purse creations.

AllCraftSupplies.com


March 6, 2010

St. Patrick's Day Jewelry using Blue Moon Beads

I want to make some little trinkets to go into the little St. Patrick's Day Treasure Box I made for my daughter.

I really like Blue Moon Beads especially their Lost & Found Collection.  The Lost & Found Collection is very easy to design with and requires very little jewelry making skill.  To purchase Blue Moon Beads visit AllCraftSupplies.com and browse their Beads Category.

I purchased three 18" Chain Necklaces and six metal charms all from The Lost & Found Collection.


I began by making a St. Patrick's Day Four Leaf Clover Necklace.  The only materials I need to add the charm to the necklace is needle nose pliers and some jump rings.  I began by opening the jump ring up with the pliers and attaching it to the charm.


I add two more jump rings; with the last connecting onto the necklace.  This necklace was very easy to make and cost under $7.00 (not including the cost of the pliers).


Next, I made a St. Patrick's Day Pin using ribbon and a Blue Moon Lost and Found Clover Charm.

First I began by threading (like an accordion) 5/8 wide ribbon onto a coil-less pin.


I threaded the ribbon onto the front of the pin until it was entirely covered and then I twisted it to give it a fun shape.


I then attached four jump rings onto the center of the pin and lastly attached the clover charm.


AllCraftSupplies.com


Disclosure

March 2, 2010

St. Patrick's Day Treasure Box

What I love about St. Patrick’s Day is that it is just so magical. The allure of fairies and Leprechauns just makes it so fun for children! I designed a little treasure box using Perler Beads and a recycled chicken bouillon container.

The night before Saint Patrick’s Day children should leave their treasure boxes out. In the morning children will awake to their treasure boxes being filled with mysterious treasures from the magical world of fairies, pots of gold, and Leprechauns. The trinkets are little though, because the Leprechauns are tiny; their small hands cannot carry big treasures.

Follow the instructions below for the perfect small treasure box to hold tiny magical trinkets. Gold glitter was added to the treasure box to attract Leprechauns because they love gold!


Materials Needed:
Washed and Cleaned Chicken Bouillon Container or Similar Style Container with a Screw Lid 
Perler Beads
Perler Peg Boards (round and square)
Ribbon
Gold Glitter Glue
Glue Dots

Instructions:
1. Begin by forming the clover using Perler Beads and a Perler Square Peg Board.
2. Finish clover according to the manufacture's finishing instructions (ironing both sides).
3. Using gold glitter glue draw the four clover leaves onto the Perler Bead Clover Shape.


4. Form a circle using Perler Beads and a Perler Circle Peg Board.
5. Finish circle according to the manufacture's finishing instructions (ironing both sides).


6. Attach ribbon around the sides of the container, use glue dots to attach the clover to the front and the circle shape to the top.  Finish the treasure box with gold glitter glue around the edges.


Look for future posts on how to make small magical trinkets; for now read my review and helpful hints for working with Perler Beads.

Click on the ad below to purchase Perler Beads from All Craft Supplies.
Disclosure

AllCraftSupplies.com


February 28, 2010

How to Make Beaded Snap Clips with Ribbon Bow Accents

Snap Clip Barrettes are a great way to pull back little girl's hair. I have designed these beaded snap clips with ribbon accents that your little one is sure to love.


Things You'll Need:
* Small Glass Beads of Assorted Colors
* 24 gauge jewelry wire
* Clear Nylon Filament
* ¾ to 1 inch Ribbon
* Hot Glue
* Spool of Clear Nylon Thread
* Snap Clips
* Wire Cutters
* Flat Nose Pliers
* Lighter or Candle

Cut 6 inches of 24 gauge jewelry wire. Bend wire around one side of the snap clip, pull tightly and wrap once more.

Cut 24 inches of Clear Nylon Filament and thread under the wire you just bent (towards the top of snap clip). Once filament is through tie it in knot. Use your Flat Nose Pliers to flatten the wire into the clip and securing the filament into place.

Begin to thread an assortment of glass beads on the wire. Thread almost to the end of the wire. Use the last bit of wire to bend it down and secure the beads in place.

Take the secured end of filament and begin to wrap it around each bead tightly. Shape the wire as you go; bending and curving with snap clip.

When you reach the other side of the snap clip, bend the wire around twice. Thread the filament through and secure with a knot. Flatten with your pliers.

To make the bow, cut a strip 3 inches long. Prevent the end of the ribbon from fraying by gently placing into the blue part of a flame only the VERY tip of the ribbon.

Join each sealed end into the center of the ribbon. Use clear nylon thread to make a running stitch up the center. Wrap the nylon thread around the center (tightly) about four times and then tie off.

Using the clear nylon thread attach the glass beads the center of the bow.

Attach the bow to the center hole of the snap clip, using the clear nylon thread.

Hot glue the bottom of the bow to the snap clip, gluing over the wire that you bent to start and finish the beading process.


AllCraftSupplies.com


Email Updates Daily by Feedburner

Enter your email address:

Delivered by FeedBurner