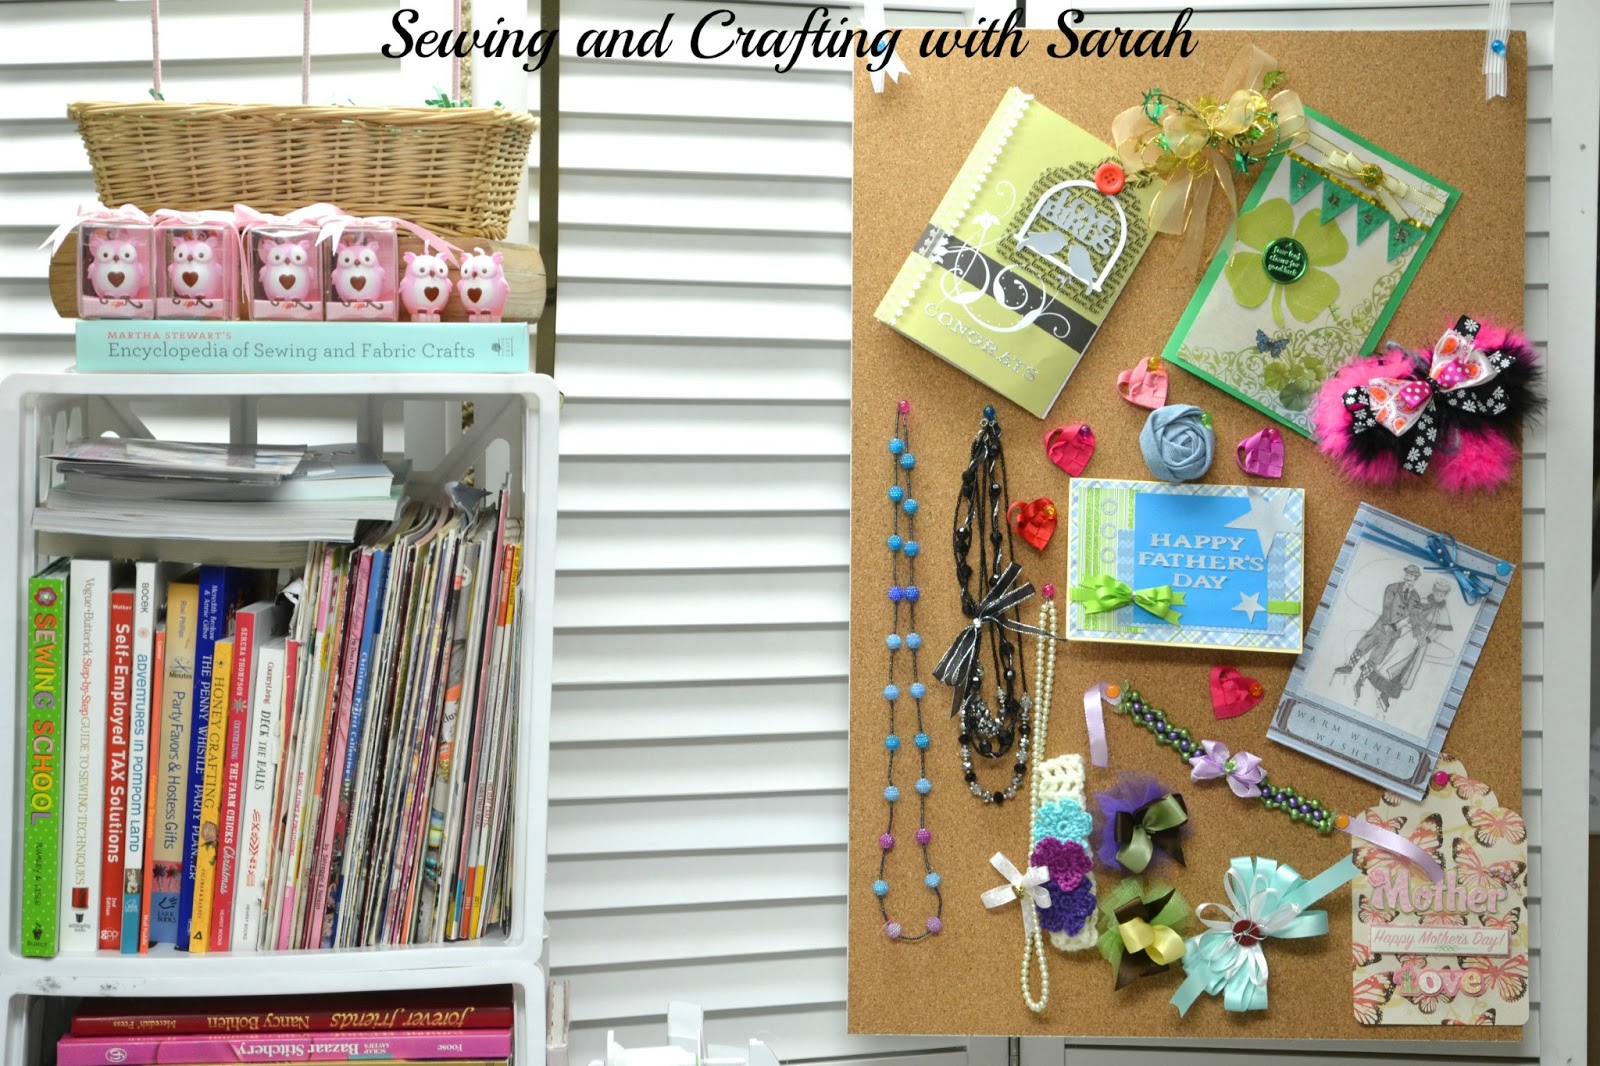
I was giving Elmer's Cork Foam Board to review. I have some cards I made, ribbon art, and jewelry that I was working on that I thought would be perfect to display on the foam board and get off my craft desk.
The foam board is light-weight and one side has a thin layer of cork. I used ribbon and thumb tacks to hang the board onto a room divider. Super simple to put up, right!
I then just used thumb tacks to display the projects I had either finished or was in the process of working on.
The foam board is thick enough that you can place thumb tacks in and they don't poke out the other side. The is a thin layer of cork that makes is durable and the thumb tacks don't tear at the foam.
Overall, I am really happy with the foam cork board. I love that I am able to display my finished or work-in-progress crafts. Best of all they are not taking up space on my craft table.
An online journal of all my sewing, crafting, and hair bow making adventures!
Showing posts with label Product Review. Show all posts
July 1, 2013
May 24, 2013
How to Add Gems to Face Painting Using Girlie Glue
Have you heard of Girlie Glue? Girlie Glue is made with Agave nectar and other all natural ingredients.
It’s safe and
100% HONEY-FREE! Girlie Glue has lots of applications - with a dab of glue now babies with fine of no hair can wear hair bows!
My little girlie has lots of hair but she is afraid to have her ears pierced. The other day, we used Girlie Glue to hold little rhinestones on her ears, all day. She was so happy to show all her friends her rhinestone earrings! I was impressed that the rhinestones stayed on her ears, all day! After staying on her ears all day I expected the rhinestones to be really hard to remove. However, with a little soap and water they were off in a flash. After having such great results with using Girlie Glue for earrings, I thought it would also be perfect for adding gems when face painting. I volunteer to face paint at our local school craft fair, each year. Wouldn't be neat to add gems to the face paintings!
After waiting briefly for the face paint to dry I glued on some gems and rhinestones. Amazing results! The gems where easy to place on the face with the Girlie Glue. And, equally easy to remove when I was done!
To learn more about Girlie Glue I invite you to visit their website, like them on facebook page, and follow them on Pinterest.
My little girlie has lots of hair but she is afraid to have her ears pierced. The other day, we used Girlie Glue to hold little rhinestones on her ears, all day. She was so happy to show all her friends her rhinestone earrings! I was impressed that the rhinestones stayed on her ears, all day! After staying on her ears all day I expected the rhinestones to be really hard to remove. However, with a little soap and water they were off in a flash. After having such great results with using Girlie Glue for earrings, I thought it would also be perfect for adding gems when face painting. I volunteer to face paint at our local school craft fair, each year. Wouldn't be neat to add gems to the face paintings!
December 11, 2012
Deck the Halls a Country Living Book Review
Deck the Halls, a Country Living book, is full of Christmas crafts, decorations, gift ideas, and punch-outs to add style to your handmade gifts. The punch-outs include Christmas note cards, sticker gift labels, gift tags, ornaments, small little gift boxes, and so much more!
I was very excited to receive this book to review! I love (and I mean LOVE) craft books that have an extra fun "twist". The "twist" with this book is that there are loads of punch-outs. I was going to use my Cricut to make my own gift tags but after receiving this book I plan to use these:
And these:
During the holidays I usually make several gift baskets. Holiday gift baskets are perfect for teachers, co-workers, and friends. I often mix both store bought and homemade baked goodies. The book provides little gift box punch outs that are the perfect fit for chocolate bars. I bought several chocolate bars that I plan to wrap with these little gift boxes and add to them to my holiday gift baskets.
If you love punch-outs like I do; you will love this book! Beyond the gift tags, gift labels, gift boxes that I have already shown. There are recipe cards, napkin holders, gingerbread patterns, wildlife stencils, Santa disguises, skeleton keys, place setting cards, I.O.U coupons, poinsettias, bird ornaments, and so much more. Here is a picture of the bird ornaments. I am not sure if I will use them as ornaments but I adore the birds.
Book: Country Living Deck the Halls (October 2012, Hearst, 9781588169235)
About the Author: Author Katy McColl is the former Executive Editor of O at Home and Country Living. Her work has appeared in the New York Times, Travel & Leisure, CBS Moneywatch.com, Best Life, Page Six Magazine,, Blueprint, InStyle Home, and other publications.
Disclosure: I received the book Deck the Halls free, in exchange for my honest opinion of the book. My thoughts and opinions of the book are my own.
I was very excited to receive this book to review! I love (and I mean LOVE) craft books that have an extra fun "twist". The "twist" with this book is that there are loads of punch-outs. I was going to use my Cricut to make my own gift tags but after receiving this book I plan to use these:
![]() |
And these:
During the holidays I usually make several gift baskets. Holiday gift baskets are perfect for teachers, co-workers, and friends. I often mix both store bought and homemade baked goodies. The book provides little gift box punch outs that are the perfect fit for chocolate bars. I bought several chocolate bars that I plan to wrap with these little gift boxes and add to them to my holiday gift baskets.
If you love punch-outs like I do; you will love this book! Beyond the gift tags, gift labels, gift boxes that I have already shown. There are recipe cards, napkin holders, gingerbread patterns, wildlife stencils, Santa disguises, skeleton keys, place setting cards, I.O.U coupons, poinsettias, bird ornaments, and so much more. Here is a picture of the bird ornaments. I am not sure if I will use them as ornaments but I adore the birds.
Book: Country Living Deck the Halls (October 2012, Hearst, 9781588169235)
About the Author: Author Katy McColl is the former Executive Editor of O at Home and Country Living. Her work has appeared in the New York Times, Travel & Leisure, CBS Moneywatch.com, Best Life, Page Six Magazine,, Blueprint, InStyle Home, and other publications.
Disclosure: I received the book Deck the Halls free, in exchange for my honest opinion of the book. My thoughts and opinions of the book are my own.
December 10, 2012
The Farm Chicks Christmas Book Review
County Living book "The Farm Chicks Christmas", is chock full of merry ideas for the holidays!
I often find craft inspiration reading DIY style craft books. Sometimes, DIY books are pages of step-by-step craft tutorials but rarely are you allowed a glimpse into the crafty life of the author. NOT this book, author, Serena Thompson, shares photos of her family and friends. The book is also full of cute little stories; like her husband Colin trying to start a tree farm only to have squirrels take it over, a super sweet story of when Serena was a child - and her Christmas wish, along with amazing pictures and sneak peeks into Serena's home and her friends' homes during the holidays.
To my surprise this holiday book not only has some amazing craft ideas but also delicious recipes. Coincidentally, my daughter just asked the other day if we could bake some holiday cookies. "Cookies that are new that we have never made before." Hmm...I wasn't so sure until I saw all these great recipes. The raspberry thumbprints and the dark chocolate mint cookies are perfect! Best of all, BONUS in the back of the book, there are adorable little sticker gift tags that read, "Baked for you by", and cut-out little recipe cards.
This Christmas, I am giving several gift cards and certificates but I didn't want to use the little paper holders. There is great instructions for making a felt gift card holder held closed with fabric covered buttons. I also loved a tree decorated by Serena's friend Teri. Teri made pom pom snowballs and decorated her entire tree with them. It turned out amazing. I think a miniature tree with snowball pom poms would look adorable in my home, this holiday.
Book: The Farm Chicks Christmas (September 2012, Hearst, 9781588169730)
More about the author: Serena Thompson runs The Farm Chicks Antique Show, in Spokane, WA; maintains a website and blog where she shares Farm Chick Style, a line of jewelry, clothing, and stationery items; and is a contributing editor to Country Living.
Disclosure: I received The Farm Chick Christmas book free in exchange for my honest opinion of the book. My thoughts and opinions of the book are my own.
I often find craft inspiration reading DIY style craft books. Sometimes, DIY books are pages of step-by-step craft tutorials but rarely are you allowed a glimpse into the crafty life of the author. NOT this book, author, Serena Thompson, shares photos of her family and friends. The book is also full of cute little stories; like her husband Colin trying to start a tree farm only to have squirrels take it over, a super sweet story of when Serena was a child - and her Christmas wish, along with amazing pictures and sneak peeks into Serena's home and her friends' homes during the holidays.
To my surprise this holiday book not only has some amazing craft ideas but also delicious recipes. Coincidentally, my daughter just asked the other day if we could bake some holiday cookies. "Cookies that are new that we have never made before." Hmm...I wasn't so sure until I saw all these great recipes. The raspberry thumbprints and the dark chocolate mint cookies are perfect! Best of all, BONUS in the back of the book, there are adorable little sticker gift tags that read, "Baked for you by", and cut-out little recipe cards.
This Christmas, I am giving several gift cards and certificates but I didn't want to use the little paper holders. There is great instructions for making a felt gift card holder held closed with fabric covered buttons. I also loved a tree decorated by Serena's friend Teri. Teri made pom pom snowballs and decorated her entire tree with them. It turned out amazing. I think a miniature tree with snowball pom poms would look adorable in my home, this holiday.
Book: The Farm Chicks Christmas (September 2012, Hearst, 9781588169730)
More about the author: Serena Thompson runs The Farm Chicks Antique Show, in Spokane, WA; maintains a website and blog where she shares Farm Chick Style, a line of jewelry, clothing, and stationery items; and is a contributing editor to Country Living.
Disclosure: I received The Farm Chick Christmas book free in exchange for my honest opinion of the book. My thoughts and opinions of the book are my own.
August 25, 2011
My Memories Nature Walk Digital Scrapbooking Pages
Only a few days left until school begins and I have had to get creative with keeping my children occupied. I decided the other day that we were going to go on a nature walk and enjoy a little exercise and some fresh air. Immediately, I heard the deep sighs and grunts of disapproval.
Nature walks are so boring, and long, and they make my feet hurt..yada yada yada.
To entice my children into walking (or bribe - whatever) I told them they each could take a digital camera (mine and my husband's) and photograph what they saw along the walk. Instantly, my 9 and 8 year old were excited for the walk.
We walked for several hours with no complaints or fighting they were both so enthusiastic about photographing flowers, nature, and landscapes along the walk!
When we arrived home I downloaded their pictures and then we went through all 112 of them. They chose the ones that they like the best and we used My Memories Suite V2 to create digital scrapbooking pages. I was given My Memories Suite V2, for free, to try out and review. I was impressed with the background pages, embellishments, clip art, layouts, and the ease of using it. It was so easy to use my children were able to help create and design their nature walk layouts!
We added buttons, little flowers, text, created different layouts, and chose a different background for each page.
We didn't add any video or music to our pages but there is an option for that, as well! The software is very user-friendly and for my first time ever digital scrapbooking I am so impressed with how quickly both me and my children were able to create with it.
To order My Memories Suite V2 and receive a $10.00 discount off of your purchase visit here and use coupon code: STMMMS93980
Bonus - Visit My Memories and check out their free downloads. I was blown away with all the downloads that they are giving away for free. No purchase or credit card information necessary you just need to create an account!!
Nature walks are so boring, and long, and they make my feet hurt..yada yada yada.
To entice my children into walking (or bribe - whatever) I told them they each could take a digital camera (mine and my husband's) and photograph what they saw along the walk. Instantly, my 9 and 8 year old were excited for the walk.
We walked for several hours with no complaints or fighting they were both so enthusiastic about photographing flowers, nature, and landscapes along the walk!
When we arrived home I downloaded their pictures and then we went through all 112 of them. They chose the ones that they like the best and we used My Memories Suite V2 to create digital scrapbooking pages. I was given My Memories Suite V2, for free, to try out and review. I was impressed with the background pages, embellishments, clip art, layouts, and the ease of using it. It was so easy to use my children were able to help create and design their nature walk layouts!
We added buttons, little flowers, text, created different layouts, and chose a different background for each page.
We didn't add any video or music to our pages but there is an option for that, as well! The software is very user-friendly and for my first time ever digital scrapbooking I am so impressed with how quickly both me and my children were able to create with it.
To order My Memories Suite V2 and receive a $10.00 discount off of your purchase visit here and use coupon code: STMMMS93980
Bonus - Visit My Memories and check out their free downloads. I was blown away with all the downloads that they are giving away for free. No purchase or credit card information necessary you just need to create an account!!
August 9, 2011
Darice Woodburning Tool Review
I have never used Darice’s wood burning tool or any wood-burning tool, for that matter. I was excited for the opportunity to use a new crafting tool. I opened the package; it comes with the wood burner, a stand, and several different wood burning tips. I experimented with the tips on scrap wood for several hours and this is what I learned:
- The wood you are working with really needs to be sanded down. The rough splintered wood is very hard to make a design on.
- The thin pointed tip works great for outlining.
- The larger rounded tip works great for shadowing almost like a crayon.
- It is best to sketch your design with pencil on the wood before you burn it.
- Do not press the tip into the wood but slowly run it along the wood.
- Mix wood-burning techniques with paint for a fun effect.
- Wait for the wood-burning tool to fully cool off before you screw another tip onto the tool.
I began by first tracing the inside of the princess cut-out with the fine tip attachment.

Then I wanted to add little leaves. There is an attachment that is shaped like a leaf that I thought would be perfect for the job. Turns out it just makes scorch marks. I wasn’t really a big fan of this applicator and was glad that I tried it out on practice piece.

Lastly, I tried the larger rounded tip to make little leaves and I loved out those turned out!

The biggest thing I learned while working with Darice’s Wood Burning Tool is not to press too hard, but too work slowly and methodically creating my image. I am a crayon snapper, I am a high-stress person and I press down really hard on everything, whether I am using a pencil, pen, or even a paint brush. Using the wood burning tool was a wonderful stress release for me. There was something very calming about knowing that I had to do it slowly and lightly or I would ruin the piece.

The final and most important thing I learned is; if you don’t like it sand it off and start again!
My review was originally posted on Crafts Unleashed.
June 29, 2010
Cuttlebug and Cuttlebug Die Cuts
Cuttlebug by ProvoCraft "Expressing creativity has never been easier. Cut shapes, emboss shapes or cut then emboss shapes. The machine and inspired die designs exclusive to the Cuttlebug system are as fun as they are simple to use. Just lower the platforms; a powerful gripping mechanism holds the machine in place. Then place cutting material and die (face up) between cutting mats and turn the handle to move the die through the machine. Remove the die cut shape and start crafting. Cuttlebug is user friendly with any die and cuts a variety of materials. Its fold-n-store profile allows storage in a small amount of space and the built-in pop-up handle allows for quick transport. Machine includes: Cuttlebug die cutter and embosser spacer block, 2 cutting pads, thin die adapter, user manual, handle, hex key tool, screw and plastic cap." Product Description provided by Amazon.com
I had been looking at the Cuttlebug Machines for sometime. I had wanted one but I am pretty new to scrapbooking and I wasn’t sure it was worth the money? I mentioned to my Mom that I was thinking about getting a Cuttlebug. And, guess what I got for my birthday from my parents? A Cuttlebug with some Cuttlebug Dies! So nice to be spoiled by your parents, even as an adult, thanks Mom and Dad!
When I opened the box the only assembly that was required was to attach the handle to the Cuttlebug. Easy enough!
The easy to follow directions explained about plate placing for the exact height you need to roll different manufactures dies through the Cuttlebug. I was using flower Cuttlebug dies; I added plate A, then plate B, scrapbooking paper, cutting dies, and then another plate B. I then rolled it through the Cuttlebug.
To my amazement and delight (I am amazed and delighted easily) I had four separate flower shapes. I used different scrapbooking paper, layered them, and added a brad in the center. I then attached the flowers with Glue Dots to the card that I had designed.
For more of my "Thank You Card" designs click here.
I have only been using my Cuttlebug for a few days but here is what I learned so far:

Cuttlebug Flower Dies (pictured above) are Item 317370 and can be found by typing the item number in the search field at AllCraftSupplies.com


Disclosure
I had been looking at the Cuttlebug Machines for sometime. I had wanted one but I am pretty new to scrapbooking and I wasn’t sure it was worth the money? I mentioned to my Mom that I was thinking about getting a Cuttlebug. And, guess what I got for my birthday from my parents? A Cuttlebug with some Cuttlebug Dies! So nice to be spoiled by your parents, even as an adult, thanks Mom and Dad!
When I opened the box the only assembly that was required was to attach the handle to the Cuttlebug. Easy enough!
The easy to follow directions explained about plate placing for the exact height you need to roll different manufactures dies through the Cuttlebug. I was using flower Cuttlebug dies; I added plate A, then plate B, scrapbooking paper, cutting dies, and then another plate B. I then rolled it through the Cuttlebug.
To my amazement and delight (I am amazed and delighted easily) I had four separate flower shapes. I used different scrapbooking paper, layered them, and added a brad in the center. I then attached the flowers with Glue Dots to the card that I had designed.
For more of my "Thank You Card" designs click here.
I have only been using my Cuttlebug for a few days but here is what I learned so far:
- The plexi-glass plates that you are using are going to get scored and you will see the die cut imprints no matter which side you place your die (face up or face down). In the picture above, I placed my die cuts face down. However, I was supposed to place them foam side face up. Though, regardless of which way you place them it still leaves an imprint on your plates. I am thinking I will absolutely have to buy new plates and I did some research and go figure they are available.
- The handle is not that easy to turn. I end up pushing through the plates and turning the handle at the same time.
- Every time you cut paper you are left with a negative space. To not waste too much paper I need to start planning what I am going to do with the left over paper.
- Die Cuts and Embossing Folders can get very expensive if I do not pace myself. I will have to look for great deals and slowly build up my supply.
Cuttlebug Flower Dies (pictured above) are Item 317370 and can be found by typing the item number in the search field at AllCraftSupplies.com
Disclosure
May 19, 2010
Out of the Office Blog by Fedex
Until I was approached by Mom Central to review the blog Out of the Office, I had not heard of it. However, I spend a lot of time at Fedex shipping out craft packages for a client of mine that does a lot of work on television. I travel to my local Fedex Kinko's office on a daily basis, know everyone by name, even know their school age children. Gotta love small towns!
My Fedex Kinko's office is a wonderful crafty resource for me, so it makes complete sense that they would have a blog full of creative ideas.
I took a look through their blog today and found it full of great information. My particular favorite is the "Parent Projects" category. One of the projects in that category was making a bookmark with your children; "Got a Good Book? Mark it!"
My children are 7 and 8 yrs old and are just starting to read chapter books on their own. Bookmarks are necessary for them to keep the book in good shape and are promoted heavily by our school library. I knew when I received a package in the mail this weekend with some bookmark templates printed on heavy cardstock, stickers, crayons, and ribbon that my daughter would be more than excited to make a bookmark. And I was right! She got started right away making and drawing on her precious bookmark. When I went to take a picture of her bookmark though she grew mad. She didn't want her bookmark pictured on my blog. I never post pictures of my children but I guess she has even grown tired of me posting pictures of her work. She wanted her bookmark to be kept secret and only something she would see. She is at the delicate age where she is setting boundaries and has strong opinions on everything. Therefore, I will respect the privacy of her bookmark!
So I sat down beside her and decided to make my own bookmark. I layered the yellow bookmark with several different cardstock patterns, a transparency sheet, small brads, added cardstock to the back to make the bookmark double-sided, and attached a large width ribbon as a tassel.
At the end of making the bookmark my daughter proudly announced that hers was better than mine. And, I happily agree!
Out of the Office recommends laminating the bookmark at Fedex to make the bookmark last longer. Visit their instructional post along with template download.
“I wrote this review while participating in a blog tour campaign by Mom Central on behalf of FedEx Office and received the items necessary to facilitate my review. In addition, Mom Central sent me a gift card to thank me for taking the time to participate.”
My Fedex Kinko's office is a wonderful crafty resource for me, so it makes complete sense that they would have a blog full of creative ideas.
I took a look through their blog today and found it full of great information. My particular favorite is the "Parent Projects" category. One of the projects in that category was making a bookmark with your children; "Got a Good Book? Mark it!"
My children are 7 and 8 yrs old and are just starting to read chapter books on their own. Bookmarks are necessary for them to keep the book in good shape and are promoted heavily by our school library. I knew when I received a package in the mail this weekend with some bookmark templates printed on heavy cardstock, stickers, crayons, and ribbon that my daughter would be more than excited to make a bookmark. And I was right! She got started right away making and drawing on her precious bookmark. When I went to take a picture of her bookmark though she grew mad. She didn't want her bookmark pictured on my blog. I never post pictures of my children but I guess she has even grown tired of me posting pictures of her work. She wanted her bookmark to be kept secret and only something she would see. She is at the delicate age where she is setting boundaries and has strong opinions on everything. Therefore, I will respect the privacy of her bookmark!
So I sat down beside her and decided to make my own bookmark. I layered the yellow bookmark with several different cardstock patterns, a transparency sheet, small brads, added cardstock to the back to make the bookmark double-sided, and attached a large width ribbon as a tassel.
At the end of making the bookmark my daughter proudly announced that hers was better than mine. And, I happily agree!
Out of the Office recommends laminating the bookmark at Fedex to make the bookmark last longer. Visit their instructional post along with template download.
“I wrote this review while participating in a blog tour campaign by Mom Central on behalf of FedEx Office and received the items necessary to facilitate my review. In addition, Mom Central sent me a gift card to thank me for taking the time to participate.”
May 12, 2010
3-D Magic Sand
Have you heard of Art Supplies Direct? I recently started talking with them about all their wonderful kid craft supplies. They have a wide variety of children's art supplies and a great teacher resource category. I became familiar with the company while writing my Children's Craft Column for the Examiner.com.
I love their philosophy; "Artists are nothing without a medium. Many will go without to make sure they can get just the right tube of paint or higher quality clay to work with. We simply make it easier and more affordable by offering the highest quality artist supplies at wholesale pricing. This means our customers can stock up on artists supplies without sacrificing quality."
Art Supplies Direct passion for art extends to young children and their teachers; "From elementary classrooms where creativity blossoms to college campuses where students pursue artistic careers, teachers are the backbone of the profession. To make sure they have the artist supplies they need to foster growth in their students, we carry a variety of items just for them. Teachers will find art supplies for kids, classroom equipment, learning games and more within our inventory."
I was excited when they sent me 3-D Magic Sand to try with my children. 3-D Magic Sand comes with six different colored sands all in their own individual 9 ounce zip-lock bags. To me this craft just screamed sandbox. We did a trial run inside on my kitchen island but we quickly ended up outside; sand in the house, silly me. What is nice about this craft is that it comes with quite a bit of sand so even though we did some of it inside there is still plenty of sand left over for them to have fun in their sandbox and maybe even at the beach.
Items that you should have on hand before beginning this craft:
Small Disposable Plastic Cups
Plastic Spoons
Water
Sand Toy Molds
Instructions:
Pour some of the sand (I placed about half) into a plastic cup. Place several drops of water onto the sand and mix. The sand should not have too much water but should be vibrant in color and sticking together. The directions indicate 15 parts of sand to 1 part of water. You are basically looking for the type of sand you would use at the beach to make a sand castle.
Using the plastic spoon scoop the sand into the center of the beach toy molds. Press the sand into the molds with the back of the spoon or your fingers. Children can layer the sand with different colors, use the same color, or mix two colors together!
Turn the molds over in the sand on the beach, in their sandbox, or onto of a paper plate. Let the sand dry for 48 hours for a hard sand shape. We allowed our sand to dry outside for several days. However, it is just sand so if it comes in contact with water or humidity it will start to dissolve. Really the fun for us was not the hardened sand but creating the wonderful colorful shapes. If you are traveling to the beach you can either leave your colorful sand creation for the next child to enjoy or bring some paper plates to take you masterpiece home.
To order 3-D Magic Sand visit Art Supplies Direct.
I would love to see pictures of your children's sand creations! Please email at sarahforhan@sarahforhan.com with the pictures and I will post them on my blog.
Disclosure
I love their philosophy; "Artists are nothing without a medium. Many will go without to make sure they can get just the right tube of paint or higher quality clay to work with. We simply make it easier and more affordable by offering the highest quality artist supplies at wholesale pricing. This means our customers can stock up on artists supplies without sacrificing quality."
Art Supplies Direct passion for art extends to young children and their teachers; "From elementary classrooms where creativity blossoms to college campuses where students pursue artistic careers, teachers are the backbone of the profession. To make sure they have the artist supplies they need to foster growth in their students, we carry a variety of items just for them. Teachers will find art supplies for kids, classroom equipment, learning games and more within our inventory."
I was excited when they sent me 3-D Magic Sand to try with my children. 3-D Magic Sand comes with six different colored sands all in their own individual 9 ounce zip-lock bags. To me this craft just screamed sandbox. We did a trial run inside on my kitchen island but we quickly ended up outside; sand in the house, silly me. What is nice about this craft is that it comes with quite a bit of sand so even though we did some of it inside there is still plenty of sand left over for them to have fun in their sandbox and maybe even at the beach.
Items that you should have on hand before beginning this craft:
Small Disposable Plastic Cups
Plastic Spoons
Water
Sand Toy Molds
Instructions:
Pour some of the sand (I placed about half) into a plastic cup. Place several drops of water onto the sand and mix. The sand should not have too much water but should be vibrant in color and sticking together. The directions indicate 15 parts of sand to 1 part of water. You are basically looking for the type of sand you would use at the beach to make a sand castle.
Using the plastic spoon scoop the sand into the center of the beach toy molds. Press the sand into the molds with the back of the spoon or your fingers. Children can layer the sand with different colors, use the same color, or mix two colors together!
Turn the molds over in the sand on the beach, in their sandbox, or onto of a paper plate. Let the sand dry for 48 hours for a hard sand shape. We allowed our sand to dry outside for several days. However, it is just sand so if it comes in contact with water or humidity it will start to dissolve. Really the fun for us was not the hardened sand but creating the wonderful colorful shapes. If you are traveling to the beach you can either leave your colorful sand creation for the next child to enjoy or bring some paper plates to take you masterpiece home.
To order 3-D Magic Sand visit Art Supplies Direct.
I would love to see pictures of your children's sand creations! Please email at sarahforhan@sarahforhan.com with the pictures and I will post them on my blog.
Disclosure
May 3, 2010
Mother's Day Card with Mother's Day Pin Accent
Read my review of the 100% Cool Badge Maker by Creative Toys and then follow the instructions below to make a fun Mother’s Day Pin perfect as an embellishment on a Mother’s Day Card.
To make the Mother’s Day Pin:
Materials Needed:
Badge Maker
Letter Punches
Tacky Glue
Small Paper Accents
1. Begin by purchasing the 100% Cool Badge Maker.
2. Cut letters for your pin using letter punches. Lay them out onto one of the paper circles.
3. Using tacky glue, glue your pattern onto the center of one the circles provided in the kit. Use their plastic template to place your design correctly in the center.
4. Place the thin plastic (provided) and then your pattern face down in the Badge Maker. Attach the front piece of the badge to the arm at the top and press down.
5. Press the lever on the side of the Badge Maker, insert the center piece of the button onto the arm and press down again.
6. Release the lever on the side, slowly lift the arm up and twist the badge to lock it in place.
7. Take the badge off of the arm and attach the back piece to the badge.
8. Your badge is done. The badge or pin (as I refer to it often in this post) is very small. However, its smallness is what makes it unique and perfect for scrapbooking.
9. Add the badge to a Mother’s Day Card. Attach ribbon around the center of the card and then pin the badge to the ribbon. For all your scrapbooking supplies visit AllCraftSupplies.com

FTC Disclosure
For more of my Mother's Day Craft Tutorials click here.
A big thank you for Craft Critique for featuring my card in their Mother's Day Carnival. For more great Mother's Day Crafts visit them here.
To make the Mother’s Day Pin:
Materials Needed:
Badge Maker
Letter Punches
Tacky Glue
Small Paper Accents
1. Begin by purchasing the 100% Cool Badge Maker.
2. Cut letters for your pin using letter punches. Lay them out onto one of the paper circles.
3. Using tacky glue, glue your pattern onto the center of one the circles provided in the kit. Use their plastic template to place your design correctly in the center.
4. Place the thin plastic (provided) and then your pattern face down in the Badge Maker. Attach the front piece of the badge to the arm at the top and press down.
5. Press the lever on the side of the Badge Maker, insert the center piece of the button onto the arm and press down again.
6. Release the lever on the side, slowly lift the arm up and twist the badge to lock it in place.
7. Take the badge off of the arm and attach the back piece to the badge.
8. Your badge is done. The badge or pin (as I refer to it often in this post) is very small. However, its smallness is what makes it unique and perfect for scrapbooking.
9. Add the badge to a Mother’s Day Card. Attach ribbon around the center of the card and then pin the badge to the ribbon. For all your scrapbooking supplies visit AllCraftSupplies.com
FTC Disclosure
For more of my Mother's Day Craft Tutorials click here.
A big thank you for Craft Critique for featuring my card in their Mother's Day Carnival. For more great Mother's Day Crafts visit them here.
100% Cool Badge Maker Review
I purchased the 100% Cool Badge Maker by Creative Toys this weekend at my local craft store. I thought that it might be a fun craft for my children to do over the summer; I also wanted to use it to make a Mother’s Day Pin.
When I opened the package, I was immediately disappointed with the instructions. Though I love to have pictures with the instructions, I hate it when it is just pictures and no words. I understand that it cuts down on the manufacture’s cost because they do not have to have several translated versions of the instructions but often just pictures can be very confusing to the consumer.
After several tries, I finally understood how it worked. Basically you place a piece of plastic in the center of the badge maker, then the badge pattern, and lastly begin to assemble the button pieces together (the pieces are interlocking and can be hard to press together).
I have so much card stock on hand I thought it would work great for the pins but card stock is too heavy. You have to use thin paper, magazine images seemed to work the very best for making the pins.
Once, I got the hang of the Badge Maker I helped my children make some pins. My children are 6 and 8 yrs old. They were immediately excited to make the badges. They worked on decorating the fronts but were quite frustrated with the assembling of the badge and needed a lot of help.
Overall the 100% Cool Badge Maker is an okay kid’s product but it is not something they can do completely on their own. Please note on Amazon.com the product did not get a good review. I think because it is hard for kids to use and needs a lot of adult help. Which I strongly agree with, the product frustrated my children more than it helped to foster their creativity.
However, for an adult it is a neat product that you can get really creative with, especially as a scrapbooking tool. I made several pins; I found magazine images the easiest to work with or embellishing the circular paper they provide with scrapbooking paper punches. I am also very excited about the thought of adding them to the center of hair bows.
Click here for the:
Mother's Day Pin and Card Tutorial Using the 100% Cool Badge Maker
Follow on Twitter @sarah_forhan
Sewing & Crafting with Sarah on Facebook
FTC Disclosure
When I opened the package, I was immediately disappointed with the instructions. Though I love to have pictures with the instructions, I hate it when it is just pictures and no words. I understand that it cuts down on the manufacture’s cost because they do not have to have several translated versions of the instructions but often just pictures can be very confusing to the consumer.
After several tries, I finally understood how it worked. Basically you place a piece of plastic in the center of the badge maker, then the badge pattern, and lastly begin to assemble the button pieces together (the pieces are interlocking and can be hard to press together).
I have so much card stock on hand I thought it would work great for the pins but card stock is too heavy. You have to use thin paper, magazine images seemed to work the very best for making the pins.
Once, I got the hang of the Badge Maker I helped my children make some pins. My children are 6 and 8 yrs old. They were immediately excited to make the badges. They worked on decorating the fronts but were quite frustrated with the assembling of the badge and needed a lot of help.
Overall the 100% Cool Badge Maker is an okay kid’s product but it is not something they can do completely on their own. Please note on Amazon.com the product did not get a good review. I think because it is hard for kids to use and needs a lot of adult help. Which I strongly agree with, the product frustrated my children more than it helped to foster their creativity.
However, for an adult it is a neat product that you can get really creative with, especially as a scrapbooking tool. I made several pins; I found magazine images the easiest to work with or embellishing the circular paper they provide with scrapbooking paper punches. I am also very excited about the thought of adding them to the center of hair bows.
Click here for the:
Mother's Day Pin and Card Tutorial Using the 100% Cool Badge Maker
Follow on Twitter @sarah_forhan
Sewing & Crafting with Sarah on Facebook
FTC Disclosure
April 14, 2010
Tropicana Decorative Planter
Check out the cool “Juicy Rewards Badge” on the right sidebar. That neat little badge means that Sewing and Crafting with Sarah was chosen to be a Juicy Rewards Insider Ambassador for Tropicana. Currently, Tropicana is offering codes on their juice cartons that then can be transferred into rewards and savings on, “Everything from golf and workout gear to waterpark and zoo admissions”. When visiting their rewards site there is a tag line that reads, “20,000 things to do with an empty juice carton”, the tag line is in reference to all there great savings programs (and they are great!).
However, I have decided to take the campaign a step further and create things with the empty cartons. For Easter I designed a fun woven ribbon Easter Basket from the Tropicana Carton. For Earth Day, I decided to create a small decorated planter using a recycled Tropicana Carton.
Materials:
• Empty, cleaned Tropicana Carton
• Saran Wrap
• Packing Tape
• DCWV The Glitter Mat Stack (Item# 318834 at AllCraftSupplies.com
)
• Yellow Tape (Electrical Tape)
• Glue Dots
Instructions:
Begin by cutting the Tropicana Carton 4” high.
Line the inside of the container with Saran Wrap and along the edges. Hold the Saran Wrap in place by taping it against the outside of the carton with packing tape.
Cut rectangular shapes of DCWV Glitter Scrapbooking Paper and using glue dots hold them in place along the sides of the carton.
Finish the all the edges of the container by attaching electrical tape along the edges (decorative tape or clear tape will work, as well).
Place rocks in the bottom of the pot for proper water drainage. Then insert plant and potting soil inside the decorative planter.
Planter makes a great home décor item and using the glitter scrapbooking paper adds an extra sparkle to a room!
If you also have a love for recycling and reusing; you can use a portion or all of your points towards “Rescue the Rainforest with Tropicana Rewards”. For every 3 points you donate 100 sq ft of the rainforest will be rescued. Click here to donate and see the great impact you, I, and many others have had on the preservation of the rainforest.
Reuse and Recycle,
Sarah Forhan
"I wrote this review while participating in the Tropicana Juicy Insiders Ambassador program by Mom Central on behalf of Tropicana. I received 12 free Juicy Rewards points and a $50 Visa gift card to use in redemption of the points and to facilitate my review."
However, I have decided to take the campaign a step further and create things with the empty cartons. For Easter I designed a fun woven ribbon Easter Basket from the Tropicana Carton. For Earth Day, I decided to create a small decorated planter using a recycled Tropicana Carton.
Materials:
• Empty, cleaned Tropicana Carton
• Saran Wrap
• Packing Tape
• DCWV The Glitter Mat Stack (Item# 318834 at AllCraftSupplies.com
• Yellow Tape (Electrical Tape)
• Glue Dots
Instructions:
Begin by cutting the Tropicana Carton 4” high.
Line the inside of the container with Saran Wrap and along the edges. Hold the Saran Wrap in place by taping it against the outside of the carton with packing tape.
Cut rectangular shapes of DCWV Glitter Scrapbooking Paper and using glue dots hold them in place along the sides of the carton.
Finish the all the edges of the container by attaching electrical tape along the edges (decorative tape or clear tape will work, as well).
Place rocks in the bottom of the pot for proper water drainage. Then insert plant and potting soil inside the decorative planter.
Planter makes a great home décor item and using the glitter scrapbooking paper adds an extra sparkle to a room!
If you also have a love for recycling and reusing; you can use a portion or all of your points towards “Rescue the Rainforest with Tropicana Rewards”. For every 3 points you donate 100 sq ft of the rainforest will be rescued. Click here to donate and see the great impact you, I, and many others have had on the preservation of the rainforest.
Reuse and Recycle,
Sarah Forhan
"I wrote this review while participating in the Tropicana Juicy Insiders Ambassador program by Mom Central on behalf of Tropicana. I received 12 free Juicy Rewards points and a $50 Visa gift card to use in redemption of the points and to facilitate my review."
Labels:
Earth Day,
Mother's Day,
Product Review,
Recycling Crafts,
Spring
Subscribe to:
Posts (Atom)


.jpg)
.jpg)
.jpg)
.jpg)


