 Usually I do all my crafting in my studio but the other night decided to work at the kitchen table so that I could
get some family time in, as well. I was showing my son a plastic mask
that I was going to layer with plaster cloth to make a fun mask for
Halloween. He asked me what I was going to make and I said either a
bunny or a cat. My son responded with a huge sigh and then a tirade
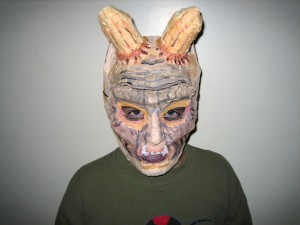
about how I always make girlie stuff and why couldn’t I make a scary
Halloween mask? To be honest I never think scary, he is right, I only
think girlie. He put the challenge out to make a scary mask and I think I
delivered!
Usually I do all my crafting in my studio but the other night decided to work at the kitchen table so that I could
get some family time in, as well. I was showing my son a plastic mask
that I was going to layer with plaster cloth to make a fun mask for
Halloween. He asked me what I was going to make and I said either a
bunny or a cat. My son responded with a huge sigh and then a tirade
about how I always make girlie stuff and why couldn’t I make a scary
Halloween mask? To be honest I never think scary, he is right, I only
think girlie. He put the challenge out to make a scary mask and I think I
delivered!A scary mask is not my crafting style but who can resist a challenge from your son.
Materials Needed: (links go to Consumercrafts.com)
1016-18 Full Face Mask
ACT231 Activa Rigid Wrap
97008 Darice Number 1 Craft and Hobby Knife
97848 Studio 71 24piece Acrylic Paint Set
Sand Paper
Masking Tape or Blue Painting Tape
Newspaper
Instructions:
1. Begin with a full face mask. Remove the elastic strap and place it somewhere safe so that it can be added later.

2. Using either masking tape or painting tape, attach newspaper and paper towel tubes to your mask for dimension.

3. Follow the instructions for attaching the plaster cloth. I found that cutting it into 1 to 2 inch strips worked the best for the fine details like around the mouth, nose, eyes, and cheekbones. When working with the plaster cloth make sure to wet and then smooth it over the mask. It will require many layers and you should attach the plaster cloth over the mask’s edge so that the plaster cloth does not break away from the mask. Once the mask is completely covered, I used the entire package of Activ Rigid Wrap. Let the mask dry overnight.

4. The following day is the fine detail work.
Begin by placing large holes in the mask to attach the elastic. I used a large yarn needle to make the holes. Just make the holes no need to attach the elastic until after the mask is painted.

5. Next, start cutting out the nose holes and any other holes that were covered accidentally by plaster cloth. The Darice Number 1 Craft and Hobby Knife is perfect for the job! Also sand down any rough spots on the outside of the mask. Lastly, clean up the inside of the mask, any flakes of plaster cloth should be wiped away.

6. Once your mask is cleaned and any rough edges are smoothed out with sand paper you can begin to paint your mask.

7. Use Studio 71 acrylic paints to apply your base coat.

8. Then to add fine detail and shadowing.

9. Lastly, reattach the elastic and wear.
I am ecstatic that my son loved his scary mask; I can’t get him to take it off! Problem though is he keeps scaring me every time I see him out of the corner of my eye, but then again, I am a girlie girl!
Disclosure: I wrote this craft tutorial last year for the Crafts Unleashed Blog. I am sharing it with you today on my blog because it was such a fun tutorial! My son still has the masks and wears it a year later whenever he feels like scaring his mother!
I saw it on Google search. I guess your thoughts are great, and thanks for blogging about this and looking forward to reading more on your site.
ReplyDelete