Showing posts with label Earth Day. Show all posts

February 10, 2014

Beaded Mardi Gras Bangle Bracelets

I am so excited to share the beaded Mardi Gras Bangle Bracelets that I made.


I was on Pinterest the other day and found a video tutorial by Mark Montano on how to make your very own ribbon wrapped bangle bracelets.  I was overwhelmed with the sheer genius of his video tutorial.  He suggested using zip ties as the base of the bangle bracelet.  GENIUS!

I have embed the video tutorial for you to view for yourself.  After you have watched the video check out my tutorial below I made just a few changes.


To make my own Mardi Gras Bangle Bracelets I just made a few modifications.

  • Instead of using clear plastic tape I used a black duct tape.  
  • Instead of fray check I used a lighter to seal my ribbon on both ends.  
  • I hot glued the two end beads together so that there would be a place for the ribbon to overlap.  
  • Lastly, my final ribbon seal I melted the ribbon end and pressed it against the other ribbon to hold it all in place.  
  • Also, be careful to check the beads. I started to make a bracelet only to realize half way through two of the beads were glued together with no spaces.


July 16, 2013

Recycled T-Shirt Messenger Bag

Sew a messenger bag using a recycled t-shirt!  This style messenger bag is really easy to make.  My daughter was really excited to recycle her dad's Army t-shirt into soft messenger bag that she could use to hold her books and journal.


I used a quilting mat and rotary cutter to cut the front, back, 2 sides, and one bottom piece.   Using a sewing machine my daughter sewed the sides to the front and back and then the bottom piece.


To finish the messenger bag we added a ribbon hem around the top edge and a ribbon strap.


Check back tomorrow when I share how I recycled one of the t-shirt arm sleeves into a doggie vest.


-->

June 26, 2013

Summer Craft for Kids DIY Button Frame

Kids bored during the summer time?  Looking for a fun summer craft?  Design a DIY button frame with a mosaic style finish. 

Here are some photos of my daughter creating her button frame. 


For the entire tutorial visit the Bowdabra Blog here - http://bowdabrablog.com/2013/06/26/kids-craft-mosaic-button-picture-frame/

June 13, 2013

Polka Dot Mason Jar Tutorial Inspired by DIY Mason Jars 35 Creative Crafts and Projects for the Classic Container

I recently had the pleasure of reading DIY Mason Jars 35 Creative Crafts and
Projects for the Classic Container.  I LOVE mason jar crafts and the thought of having an entire book dedicated to them made me super excited!

One of the crafts that really intrigued me was a sparkle mason jar.  Author, Melissa Averinos makes a sparkle mason jar by using star confetti, mod podge, and glitter.  Her sparkle mason jar looked beautiful and I was inspired to make my own version.


To make my polka dot mason jar I began with the following materials:


Next, to make my project I began by brushing the antique matte mod podge on the inside of the jar.  I chose the antique matte mod podge because I want my project to be muted and not so bold.  The antique matte mod podge is perfect for that!  Next, I sprinkled some sequins inside of the jar.


I then slowly started sprinkling some green and silver glitter into the mason jar.


Once the entire jar was covering in glitter I wanted an hour and then added another layer of antique matte mod podge to completely seal the inside of the jar.  It took about 12 hours for the entire thing to completely dry.  At first it looked blotchy and I was worried that this was a craft fail.  However, after 12 hours everything looked great and I love it!  You can place an electric tea light inside or a candle.  You can also place a smaller jar inside and use it as a vase.

The sequins look just like painted polka dots and the antique matte mod podge along with the glitter gave the jar a frosted look!


Love this project and are looking for more mason jar craft inspiration? DIY Mason Jars: Thirty-Five Creative Crafts and Projects for the Classic Container by Melissa Averinos is separated into five parts.  The first part is all about the history and miscellaneous goodness of mason jars, second part is using mason jars in the kitchen, third part is using mason jars around the home, fourth part how to gift give with mason jars, and final fifth part is creative uses for mason jars.


Each tutorial has a material list along with clear step-by-step instructions.  Best of all there wasn't a single craft that I didn't have supplies on hand to make!  I hate when craft books have such obscure materials that I would have to invest hundreds of dollars in supplies just to make a single craft.  The crafts are easy to make, easy to follow - my kind of book!

April 10, 2013

Recycled Altoid Dispenser

So....we have a serious addiction to Altoids here at my house.  However, we like licorice and ginger and I can only buy those in bulk.  I came across a wooden dispenser at Goodwill that I think is some sort of pipe box.  I knew instantly that it would be perfect for an Altoid dispenser to hold all our little metal boxes.


I bought the box at Goodwill for $1.99.  Before transforming it I wiped it down with a wet washcloth to remove all the dust.  I then finished the wooden box with Martha Stewart Paper, Antique Mod Podge, and a Mini Bowdabra Bow.

Here is a list of my materials:

For the full tutorial please visit my detailed instructions on the Bowdabra Blog.

April 4, 2011

Scrap Fabric - Bunny

If you have been following along with my blog posts today, it is all about creating with scrap fabric.   I love finding a use for scrap fabric because I adore fabric (yes, I have a weird love for fabric) and I don't like seeing any of it go to waste.  And, of course, these posts are also Earth Day inspired.

One of my favorite fabric craft books is Scrap Savers Bazaar Stitchery by Sandra Lounsbury Foose.  It is an older book but the projects fit my style.  The book has a section for fabric gift-making crafts, a holiday fair section, kid's toy fabric crafts, and decorating your home for the holidays with fabrics.

Over the weekend I worked on making little bunnies for my children's Easter Baskets.  Below are pictures of the first one I made.


For my other scrap fabric post visit the Bowdabra Blog to make a No-Sew Rag Bow.


Craft Designer: Sarah Forhan
Follow on Twitter @sarah_forhan
Sewing & Crafting with Sarah on Facebook
Stumble It: 

March 28, 2011

How to Make a Plastic Snake Kid's Toy

Reuse plastic Easter eggs to make this fun plastic snake kid's toy.  This is a perfect Earth Day craft, reusing something that you might otherwise throw-away after Easter.


I have seen this craft with older style Easter eggs.  The older style plastic Easter eggs do not have holes at the top for ventilation if a child puts them in their mouth.  Using the older style eggs for this craft requires you to drill your own holes into the eggs. The newer style Easter eggs usually have two holes at the top and bottom of the eggs.  The pre-drilled holes in the eggs make this craft really simple and easy to assemble.


Materials Needed:
Plastic Lacing Cord
Newer Style Plastic Easter Eggs with two holes on the top and bottom
Googly Eyes
Red Paper Tongue

Instructions:
  • Knot the end of a strand of plastic lacing cord about 30 to 36 inches long.
  • Thread the plastic lacing cord through one of the top shell openings. Continue threading the lacing cord through the top shells alternating the left and right holes as you go.
  • Knot the end of the lacing cord when you have threaded all the top egg shells.
  • Decorate the snake head using the bottom of one of the eggs. Attach googly eyes and a paper red tongue to the snake’s face. Then just snap it in place on the last top shell.
  • Bend and slither your new recycled Easter Egg Snake.


Craft Designer: Sarah Forhan
Follow on Twitter @sarah_forhan
Sewing & Crafting with Sarah on Facebook

March 24, 2011

Easter Eggs for Spring Decor

Blown eggs (tutorial available here) are so delicate, fragile, but perfect in shape and contour. Eggs truly represent the bountiful gifts of Mother Nature. Of course, eggs can be eaten and their shells can be used for compost. But decorating with eggs opens a whole new element of home décor, a natural earth-friendly decorating item.


How to Decorate Blown Eggs

Materials Needed:
Instructions:

1. To decorate your blown colored eggs begin by making a simple wire wrapped loop at one end of the 18 gauge wire. Don’t be intimidated it is very easy to make. I specifically chose, 18 gauge wire because it is very easy to work with, easy on your hands, and very malleable.

wrapped_wire_loop

2. Thread the small 4mm transparent faceted beads onto the 18 gauge wire in any style pattern. Depending on how many loops you would like to wrap around your egg is how long your wire should be. Experiment with different lengths of wire. I found it interesting to vary the lengths of my wire for different eggs so no two eggs looked alike.

3. Finish the end with another wire wrapped loop, to hold strung beads together. Next, twist the wire so that the center has the largest loop and the two outer edges have smaller loops.

twirled_wire

4. Place the egg into the center of the loop and then gently start to manipulate the wire and beads so that it is wrapped around the blown egg.

finished_blown_egg

5. Place decorated eggs into Consumer Crafts little 3” nests for a wonderful springtime and Easter home décor decoration.

eggs_in_nest

Come back tomorrow for a variation of this craft. Instead of resting eggs in a nest, learn the final steps to hang eggs!

Original Post at Crafts Unleashed, craft material provided by Consumer Crafts
Craft Designer: Sarah Forhan
Follow on Twitter @sarah_forhan
Sewing & Crafting with Sarah on Facebook
Bowdabra Ribbons Crafts & Things on Facebook
Stumble It: 

March 23, 2011

How to Blow and Dye Easter Eggs

Springtime is a wonderful time to decorate your home. I love to decorate my home with natural elements and spring is no exception. Actually, as the outdoors starts to become alive with new growth it seems even more fitting to have “green” décor in your home. With the arrival of spring, the coming of Easter, and Earth Day this craft is all encompassing and one of those crafts that can stay up in your home for months.

Though dying, blowing and decorating eggs are not necessarily hard, it is time consuming.


How to Dye and Blow Eggs

Materials Needed:
  • White Eggs
  • Lemon Juice
  • Egg Dying Kit
  • Yarn Needle

Instructions:

1. Begin by dying the white eggs. To dye the eggs I fully submersed the eggs in a mixture of half part lemon juice half part warm water for 20 minutes.

 
2. Allow eggs to dry for at least an hour.


3. When eggs are fully dry; pierce the top of the egg with a yarn needle. Turn the egg over gently pierce the bottom of the egg, as well. Rotate the yarn needle inside of the egg to break-up the egg yoke and to enlarge the bottom hole slightly. I have experimented with many types of piercing tools. The reason why I recommend a yarn needle, versus anything else, is because of its very sharp point and because of its gradual tapering, unlike a nail that has a sharp point but then gets larger in diameter right after the point.


4. Place a bowl below your egg, in the smaller hole at the top of the egg, blow with steady bursts of air. The eggs contents will start to flow through the larger bottom hole. Wash your lips immediately after with warm water because there may be some dye that gets on your lips. I looked in the mirror right after doing this and I did have green lips. However, it came right off with a wash cloth and some warm water.
 
5. Follow the above steps for all of your colored eggs.


Craft Notes: Unfortunately, the eggs’ contents are not safe to eat because of the length of time the eggs have been sitting out drying and unrefrigerated. If you prefer to be able to reuse the egg yokes for cooking you must blow the eggs before dying them. However, cold eggs are very hard to blow. I would recommend letting the eggs sit on the counter for at least 10 minutes before blowing. To dye the eggs that has already been blown DO NOT use vinegar or lemon juice with the dye. The vinegar and lemon juice create a weird chemical reaction with the inside of the eggs and the dye becomes very foamy. Only use water and dying tablets and allow the eggs to dry for several hours. Water and dye will leak through the holes of the eggs.

Original Post at Crafts Unleashed
Craft Designer: Sarah Forhan
Follow on Twitter @sarah_forhan
Sewing & Crafting with Sarah on Facebook
Bowdabra Ribbons Crafts & Things on Facebook
Stumble It:

April 22, 2010

Earth Day Carnival with Craft Critique

A big thank you to Craft Critique for providing a link to my Earth Day Crafts in their Earth Day Carnival.


There are so many great Earth Day Crafts in their carnival, you should check it out! I have already looked at a few that were outstanding!

Kudos To:
Alyice love your new canvas!
Jenny at CraftTestDummies the coffee filter flowers, rock!
Cyndi has a great tutorial for bottle cap pins. I heart bottle caps!
All the great designers at Crafts Unleashed we came out with some outstanding Earth Day Crafts!

April 15, 2010

Bottle Cap Barrettes

I love to recycle whenever I can. I think there is this thrill of knowing that you could take something that would have been otherwise trash and turn it into something wonderful.

I wanted to make my own unique barrette using a bottle cap. However, I didn’t want it to be a tradition bottle cap barrette where the bottle cap was decoupaged with an image and then hot glued onto the center of a bow. I wanted something new, unique, lasting, safe, and comfortable to put in my daughter’s hair.

Materials:
Bottle Cap
Alligator Clip
3/8” wide ribbon
Fiberfill
Hot Glue Gun
Small Swatch of Fabric

Instructions:
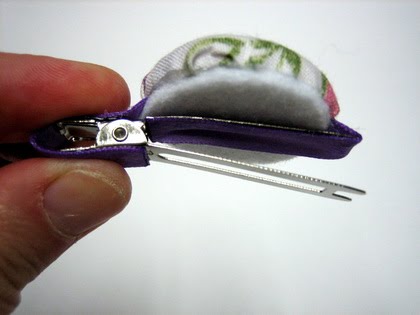
Begin by cutting 12” of 3/8” wide ribbon. Fold the ribbon in half, at the center crease mark hot glue it onto the top of the bottle cap. Bring the ribbon around the side and hot glue just along the edge.


Using a small amount of fiberfill lay it on top of the cap and along the edges. Helpful Hint: Hot glue along the edge of the bottle cap then place fiberfill on top.


Cut a fabric circle just large enough to fold the sides down into the bottle cap. Hot glue the sides of the fabric to the insides of the bottle cap; pinch, fold, and then hot glue. Hot glue the ribbon tails just to the side of the bottle cap.


The inside of the bottle cap doesn’t look so pretty, so to pretty it up fill the cap with fiberfill and then place a finishing circle of stiff felt held in place with hot glue.


Use the ribbon tails to hot glue the ribbon to the alligator clip, trim away excess ribbon.


There is a lot that you can do with this bottle cap barrette and I am really just getting started with it. I am thinking of sewing things on to the fabric, fun faces, little creatures, and other embellishments. I would love to see what you do with this craft. If you make any please link back so I can showcase your work to my readers.


For more of my barrette tutorials visit my Boutique Crafts and Gifts Directory
For more bottle cap crafts visit my tutorial: Recycle Craft: Buggy Mod Podge Bottle Caps


AllCraftSupplies.com

Email Updates Daily by Feedburner

Enter your email address:

Delivered by FeedBurner