Showing posts with label Halloween. Show all posts

October 25, 2012

Q-Tip Skeletion Kids Halloween Craft

I have been searching for fun kids crafts this Halloween.  Specifically, I was looking for a quick, no mess craft that I could do with my daughter's fourth grade class.  We have lots of activities planned for their classroom Halloween party but I thought a simple craft would also be nice.

I loved the Q-Tip Skeleton, craft project, that I found at Fun Family Crafts.  The craft seemed simple enough and, best of all, inexpensive.  I knew that I could easily purchase supplies for 20 children and it would cost me less than $10.00 for everything!

However, I was concerned about a few things.  I didn't want the children to have to cut the Q-Tips in half for the skeleton's feet and hands.  When I tried to cut the Q-Tips it was a little difficult.  Also, more often than not the Q-Tips went flying when I cut them.  I also noticed when gluing the Q-Tips the only way they stayed was if they had glue on the soft cotton part of the Q-Tip - making layering of the Q-Tips difficult.  Lastly, I didn't want to also have to provide white paper for the skeleton head. 

Here is my variation of the Q-Tip Skeleton:

 Materials: 
13 Q-Tips
RoseArt Washable School Glue
RoseArt White & Colored Washable Chalk
Black Cardstock

Instructions:
To begin with I laid out the Q-Tips and formed the skeleton shape.  Before gluing down the Q-Tips I drew with white chalk the skeleton head and the spine.  Next, I glued the Q-Tips to the black cardstock.  (To glue the Q-Tips place the glue on the soft cotton part of the Q-Tips).  Once, I had glued the Q-Tips I used chalk to create the bones for the hands and feet.  Lastly, using colored chalk I added some pumpkins and BOO.  


September 28, 2012

Mini Fabric Candy Corns

Design these fun mini fabric candy corns that can be used for Halloween decorating, cards, party favors, or hair bow centers.  To create the fabric candy corns I used extra wide double-folded bias tape, maxi piping, and baby rick rack.  Follow the step-by-step tutorial to make several fabric candy corns.


Materials List:
  • Orange Extra Wide Double-Folded Bias Tape
  • White Extra Wide Double-Folded Bias Tape
  • Yellow Maxi Piping 
  • Yellow Baby Rick Rack
  • Yellow, White, and Orange Thread


Instructions:
1. Begin by cutting 2" of white bias tape.  Fold the bias tape in half, press the corners in a tack them down.  Finish by folding the ends in and sew them together.


2. Cut 1.5" of maxi yellow piping.  Fold the piping around the white bias tape.  Sew it in place.


3. Cut 1.75" of orange bias tape.  Fold the ends in at an angle and sew it into place onto the white bias tape.


4. The candy corns can be finished or you can add rick rac.  This is what they look like without the rick rack.


5. Add rick rack along the bottom of the orange either by stitching or gluing into place.


6. Attach candy corns to hair bows, gift packages, and party favors.


October 29, 2011

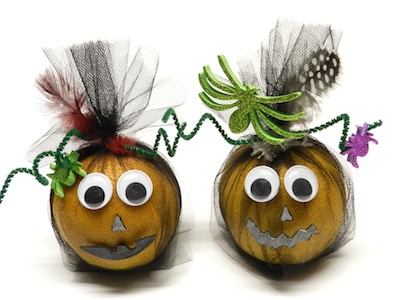
Deranged Orange Halloween Heads

Create these easy "Deranged" Halloween heads as a fun classroom craft.  To make this craft I used oranges for the base of the head.  I wanted to use oranges so that after Halloween kids have a healthy food option.  - Fun little twist on all the candy that usually accompanies Halloween festiveness.

Materials:
Black 6" Tulle
Rubber-bands
Googly Eyes
Foam
Halloween Foam Stickers
Green Pipe Cleaners
Craft Feathers
Glue Dots Craft
Scissors
Pinking Sheers (optional)

Instructions:
1. Purchase oranges to use to create your deranged Halloween heads.


2. Cut two tulle strips, 12" long.  Fold the strips and half and the place then in a X.  Place the orange in the center.


3. Hold the tulle in place with a small rubber-band.


4. Trim the top of the tulle with pinking sheers.


5. Wrap a pipe cleaner around the top of the rubber-band.  Add a feather to the pipe cleaner.  Twirl the ends of the pipe cleaner around your finger to create fun ringlets.

6. Using Glue Dots Craft attach googly eyes, a nose, mouth, and some Halloween foam stickers.

* I will be bringing oranges into my daughter's 3rd grade class to make this craft.  However, I will cut the tulle and rubber-band it in place for all the kids.  The kids should have fun decorating the heads but the tulle might be too difficult.

September 23, 2011

Halloween Plaster Paris Mask Tutorial


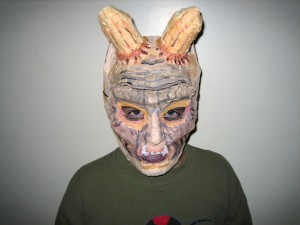
Usually I do all my crafting in my studio but the other night decided to work at the kitchen table so that I could get some family time in, as well. I was showing my son a plastic mask that I was going to layer with plaster cloth to make a fun mask for Halloween. He asked me what I was going to make and I said either a bunny or a cat. My son responded with a huge sigh and then a tirade about how I always make girlie stuff and why couldn’t I make a scary Halloween mask? To be honest I never think scary, he is right, I only think girlie. He put the challenge out to make a scary mask and I think I delivered!

A scary mask is not my crafting style but who can resist a challenge from your son.

Materials Needed: (links go to Consumercrafts.com)
1016-18 Full Face Mask
ACT231 Activa Rigid Wrap
97008 Darice Number 1 Craft and Hobby Knife
97848 Studio 71 24piece Acrylic Paint Set
Sand Paper
Masking Tape or Blue Painting Tape
Newspaper

Instructions:

1. Begin with a full face mask. Remove the elastic strap and place it somewhere safe so that it can be added later.
IMG_4955_1

2. Using either masking tape or painting tape, attach newspaper and paper towel tubes to your mask for dimension.
IMG_4960

3. Follow the instructions for attaching the plaster cloth. I found that cutting it into 1 to 2 inch strips worked the best for the fine details like around the mouth, nose, eyes, and cheekbones. When working with the plaster cloth make sure to wet and then smooth it over the mask.  It will require many layers and you should attach the plaster cloth over the mask’s edge so that the plaster cloth does not break away from the mask. Once the mask is completely covered, I used the entire package of Activ Rigid Wrap. Let the mask dry overnight.
IMG_4965_2

4. The following day is the fine detail work.
Begin by placing large holes in the mask to attach the elastic. I used a large yarn needle to make the holes. Just make the holes no need to attach the elastic until after the mask is painted.
IMG_4972_1

5. Next, start cutting out the nose holes and any other holes that were covered accidentally by plaster cloth. The Darice Number 1 Craft and Hobby Knife is perfect for the job! Also sand down any rough spots on the outside of the mask. Lastly, clean up the inside of the mask, any flakes of plaster cloth should be wiped away.
IMG_4975_2

6. Once your mask is cleaned and any rough edges are smoothed out with sand paper you can begin to paint your mask.
IMG_4979_3

7. Use Studio 71 acrylic paints to apply your base coat.
IMG_4983_5

8. Then to add fine detail and shadowing.
IMG_4989_6

9. Lastly, reattach the elastic and wear.

I am ecstatic that my son loved his scary mask; I can’t get him to take it off!  Problem though is he keeps scaring me every time I see him out of the corner of my eye, but then again, I am a girlie girl!

Disclosure: I wrote this craft tutorial last year for the Crafts Unleashed Blog.  I am sharing it with you today on my blog because it was such a fun tutorial!  My son still has the masks and wears it a year later whenever he feels like scaring his mother! 

September 22, 2011

Halloween Pumpkin Decor

Halloween is a great holiday to decorate for.  It is fun to let your imagination go wild and get creative -- Best of all you can't go wrong with Halloween.  Sometimes the worst the decoration looks the best; spooky and eerie! 

I am a big fan of pumpkin decorations.  I use them as table centerpieces, small little place-setters, and throughout my home.  I created at tutorial for the Bowdabra Blog on how to easily add ribbon and bows to a pumpkin for a very glam Halloween look!  Check out my easily to follow tutorial at Bowdabra.


September 20, 2011

Halloween Table Decor with Party Favors

Create "spook"-tastic Halloween Table Decor using natural items like branches, recycled glass jar, and even popcorn kernels! 


Add bottle cap charm necklaces, they work great to decorate the tree and are an amazing party favor!  Give the bottle cap charm necklaces as a Classroom Party treat or even as a healthy alternative to giving candy to trick-or-treaters.  All ages will love these festive Halloween Necklaces!


Visit my blog post at Crafts Unleashed for the full tutorial!

October 5, 2010

Bowdabra Halloween Hair Bow

I love hair bows and I wanted to make something unique and different for my hair this Halloween.

Using the Bowdabra Hair Bow Tool and Ruler and following the interactive software that comes with it I made a Basic Bow with 8 Loops and 3" Tails. 


I then attached my bow to a marabou lined headband with Bowdabra Bow Wire.  Next, I got to work on crocheting a spider.

Crocheting a spider pattern (For the full original tutorial with a spider web, check out my post on Crafts Unleashed.) .

Chain 4, and then slip stitch to form a circle.

Next double stitch 12 times inside of the circle, slip stitch to finish the circle.

Chain 10 and then single crochet back. Crochet to the next stitch then chain 10, single crochet back.

Continue making legs around the circle.


Make all eight legs and then tie off the yarn and trim away.

Once my spider was crocheted I tied it to the center of my hair bow using the remaining Bowdabra Bow Wire (trim away excess wire). Then, lastly I hot glued some gems onto the spider for eyes.


This unique headband is now ready to wear!

Visit Bowdabra's Store for the Bowdabra Hair Bow Tool and Ruler, Bowdabra Bow Wire, tons of really great ribbon, value packs, and so much more!  Use Coupon Code OPEN1010 to get a 5% discount on your order!

Follow on Twitter @sarah_forhan
Sewing & Crafting with Sarah on Facebook


Disclosure

September 30, 2010

Handmade Halloween Costumes

Why buy Halloween costumes when you can make them?  Granted it takes a little more time and planning than store bought but it is so much more fun!

Looking for some ideas?

Visit my instructions at Crafts Unleashed for my Mardi Gras Style Halloween Mask Perfect for Younger Children


Looking for a scary mask?  Visit my instructions for making a plaster cloth monster mask.


Or check out my dress-up category for making a caterpillar costume, butterfly costume, a bumble bee costume plus wings, and lastly fun bug antennas.

Fun Bug Antennas

Bumble Bee

Butterfly

Caterpillar

AllCraftSupplies.com

September 27, 2010

Elmer's CraftBond and X-Acto Products Review

Who hasn’t heard of Elmer’s glue right? Elmer’s glue is a huge crafting staple. But what I didn’t know is that they also have a whole slew of new products. I was asked by BzzAgent to try some of Elmer’s new products. I was super excited to give them a try.

I used the Elmer’s products I received to make this Halloween Card.


First I began by scalloping the edges of a piece of acrylic paper. I then used the X-ACTO Corner Rounder Punch to “round” the corners. Just a side-note I am completely in love with the corner rounder punch and I think it is a must have scrapbooking accessory!


Next, I painted a spooky scene using acrylic paints.


I designed my actual Halloween card by first gluing tiny little alphabet hole punches that read, “Happy Halloween” to the bottom of the card. I always have a really hard time gluing the small paper punches but the Elmer’s CraftBond Clear Glue Pen made it super easy to attach the punches to the card and it really does dry clear and invisible!


Next using the Elmer’s CraftBond Permanent Tape Runner I attached my spooky painted scene to the front of the Halloween Card. I couldn’t believe how easy the tape runner was to use. I am completely hooked.


Lastly, I made little paper ghosts using the X-ACTO decorative scissors to finish the bottom of the ghosts. To give the ghosts dimension and to make them "pop" I used large Elmer’s CraftBond Glue Spots.
 Disclosure

AllCraftSupplies.com

September 23, 2010

Scary Halloween Mask

You would think as a crafter that my children would love to wear and use all the stuff I make. Sadly, that is just not the case. My children see me craft all the time so it is not that special to them. They want unique and different.

Recently, I sat down to make a Halloween Mask using Rigid Wrap. The process intrigued my son because we had used something very similar last year to make a diorama together. We had some great bonding time making the diorama and he was hoping that he could help with the Halloween mask.

His first and most important question before we even began was, “What is the mask going to be?”

“I am thinking that I could easily make a cute kitten or bunny mask”, was my response.

He became upset with my answer because he thinks I make things too, “girlie”. We sat down together and began to scour the Internet for scary Halloween mask images. Who knew there were so many? Seriously!

After a long search we found a scary mask that he really liked and we then set out to make a similar shape with Rigid Wrap. Click here for complete instructions with pictures.

We had so much fun making the mask. Poor guy when it was all done he asked if we had to put a bow or some ribbon on it? It made me laugh, I promised no ribbon, and to start making more boy projects!

Email Updates Daily by Feedburner

Enter your email address:

Delivered by FeedBurner