I have a huge pile of scrap ribbon and I devised a simple way to organize it all. Using colorful index cards I folded the cards in half, notched them at the fold, and then just wrapped the ribbon around them.
I sorted the ribbon by sizes and then color coded the cards to match the sizes. The smaller width ribbons are pink cards, medium sized ribbon orange, and larger width ribbon yellow.
-->
An online journal of all my sewing, crafting, and hair bow making adventures!
Showing posts with label Ribbon. Show all posts
July 9, 2013
March 19, 2013
How to Make a Mini Bowdabra Bow with Button Center
Learn how to make a Mini Bowdabra Bow with button center with my tutorial below. This style bow is perfect for hair bows, card making, scrapbooking pages, and so much more!
Be sure to tune in tomorrow when I show you how to use this style bow for making pinwheels for springtime home decor! Plus a Blog Hop tomorrow with my fellow Bowdabra Designers for even more pinwheel crafts. Woot! Woot!
Materials Needed:
1. Begin by placing the Hair Bow Tool & Ruler (metric side) onto the Mini Bowdabra. Cut 18" of Bowdabra Bow Wire and fold it in half. Place the wire into the Mini Bowdabra.
2. Place the end of the ribbon into the Mini Bowdabra leaving a 4cm tail.
3. Fold and press the ribbon to create your first loop. Press the loop at the 2cm mark. Make a matching loop on the other side.
4. Make two more 2cm loops.
5. Cut the ribbon at the 4cm mark to make a matching tail.
6. Scrunch down with the Mini Bowdabra Wand.
7. Thread the two loose ends of the Bowdabra Bow Wire through the loop.
8. Pull the wire tightly.
9. Remove the bow and thread the loose ends of the wire through a coordinating button.
Be sure to tune in tomorrow when I show you how to use this style bow for making pinwheels for springtime home decor! Plus a Blog Hop tomorrow with my fellow Bowdabra Designers for even more pinwheel crafts. Woot! Woot!
Materials Needed:
-
Darice Bowdabra Hair Bow Making Kit
- Darice Bowdabra Wire 50 Feet
- Thin Width Ribbon
- Button
1. Begin by placing the Hair Bow Tool & Ruler (metric side) onto the Mini Bowdabra. Cut 18" of Bowdabra Bow Wire and fold it in half. Place the wire into the Mini Bowdabra.
2. Place the end of the ribbon into the Mini Bowdabra leaving a 4cm tail.
3. Fold and press the ribbon to create your first loop. Press the loop at the 2cm mark. Make a matching loop on the other side.
4. Make two more 2cm loops.
5. Cut the ribbon at the 4cm mark to make a matching tail.
6. Scrunch down with the Mini Bowdabra Wand.
7. Thread the two loose ends of the Bowdabra Bow Wire through the loop.
8. Pull the wire tightly.
9. Remove the bow and thread the loose ends of the wire through a coordinating button.
March 15, 2013
How to Make Wired Fabric Ribbon Craft Tutorial
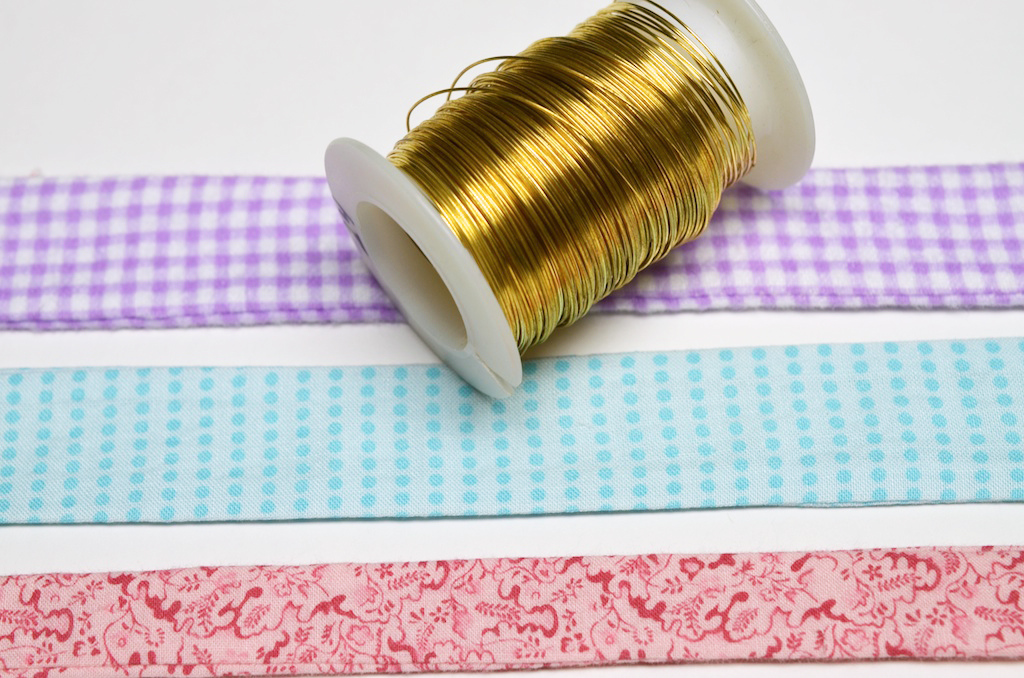
I have lots of scrap fabric and I am always looking for creative ways to use it! Follow my craft tutorial to make your own wired fabric ribbon! I made the fabric ribbon double sided and added 24 gauge wire so that it would easily hold its shape.
Materials Needed:
Strips of Assorted Fabric
24 Gauge Wire
Wire Cutters
Scissors
Sewing Machine
Matching Thread
Pins
Instructions:
1. Begin by cutting strips of fabric. I cut my fabric 22" long and varied the width from 1" to 1.5" wide.
-->
Materials Needed:
Strips of Assorted Fabric
24 Gauge Wire
Wire Cutters
Scissors
Sewing Machine
Matching Thread
Pins
Instructions:
1. Begin by cutting strips of fabric. I cut my fabric 22" long and varied the width from 1" to 1.5" wide.
2. Sew each strip of fabric together (right sides facing each other) leaving the ends open. Turn the fabric right side out. Next, cut 2 matching 24 gauge wires 2" longer than you will need.
3. Bend the end of the wire so that it doesn't snag on the fabric. Place the wire through the fabric.
4. Place the wire along the edge of the fabric. Sew a hem to keep the wire in place. Go slowly, you could possibly break your sewing needle if you sew on the wire.
5. Add wire to the other side of the fabric. Sew a hem on the other side. Then trim away excess wire and fold the fabric ends. Hem the ends, as well.
6. Follow the instructions to make several wired fabric ribbons.
-->
March 11, 2013
Wired Burlap Ribbon by FloraCraft
Burlap is a hot craft trend, right now! So it completely makes sense that I would find wired burlap ribbon by FloraCraft, at my local craft store. At first glance, I only saw FloraCraft Ribbon Burlap Garland 5"x 10yd
. Then I noticed the wired ribbon and I did a little happy dance (happy dance on the inside that is - there was no dancing in the craft aisles).
The burlap ribbon made the perfect bow for a spring home decor project, I was working on over at the Bowdabra Blog. It was easy to use with the Bowdabra Bow Maker
and I made a bow in no time. Because it is wired burlap it holds its shape nicely. I even love the fraying on the ribbon tails that you get with burlap.
-->
The burlap ribbon made the perfect bow for a spring home decor project, I was working on over at the Bowdabra Blog. It was easy to use with the Bowdabra Bow Maker

-->
February 28, 2012
Wooden Ribbon Rack {Tutorial}
Yesterday, I shared photos of my craft room. I designed a ribbon holder to display my ribbon and free up some space.
To make the ribbon holder I went to my local hardware store. I chose a hardware store that would cut the wood for me. I prefer my local Home Depot just because I know where everything and they always cut the wood for me without an issues. First, I asked them to cut a 1" by 10" in half for me. The half cut gave me the sides. Please note a 1" by 10" is actually 3/4" x 9-1/4" - one of life's little mysteries. Next, I asked them to cut the bottom and top for me. I need the bottom and top to be 34" long. I purchased 36" oak dowels which gives an inch sticking out on either side.
Using a drill bit I drilled holes into the wood where I wanted to place my dowels. I clamped the wood together and drilled the holes so that I would be sure they would meet evenly. I place larger holes at the bottom for large heavy spools of ribbon. And smaller holes using thin width dowels for the top.
Once all my holes were done I just framed it using L-brackets.
I then inserted the dowels and added the ribbon spools. If the ribbons spools are too heavy for the oak dowels you can use metal rods but it is more expensive and harder to cut.
To make the ribbon holder I went to my local hardware store. I chose a hardware store that would cut the wood for me. I prefer my local Home Depot just because I know where everything and they always cut the wood for me without an issues. First, I asked them to cut a 1" by 10" in half for me. The half cut gave me the sides. Please note a 1" by 10" is actually 3/4" x 9-1/4" - one of life's little mysteries. Next, I asked them to cut the bottom and top for me. I need the bottom and top to be 34" long. I purchased 36" oak dowels which gives an inch sticking out on either side.
Using a drill bit I drilled holes into the wood where I wanted to place my dowels. I clamped the wood together and drilled the holes so that I would be sure they would meet evenly. I place larger holes at the bottom for large heavy spools of ribbon. And smaller holes using thin width dowels for the top.
Once all my holes were done I just framed it using L-brackets.
I then inserted the dowels and added the ribbon spools. If the ribbons spools are too heavy for the oak dowels you can use metal rods but it is more expensive and harder to cut.
February 27, 2012
A Glimpse into my Craft Room
My craft room is one of those things that can get out of hand really quickly. I do so much creating in this room the absolute last thing I want to do is organize and clean it. My craft room is my escape my "break-free" room where I can be me. However, when it is a mess I can't stand being in here. I feel overwhelmed and completely uncreative.
If you notice from my last post I haven't posted anything since January 1, 2012. Why you ask? My craft room was an absolute disaster from holiday crafting and I couldn't stand to be in it. I craft every day for Bowdabra but most of that crafting I was doing in my sun-room so that I didn't have to be in here. I would hurry downstairs grab a few totes and rush back upstairs to the my warm, sunny, glorious sun-room. However, the problem with being upstairs is one I am limited to what I grab in a tote. I have so much craft stuff I don't really know what I have unless it is organized. Two my husband absolutely hates craft clutter so it strewn all over the upstairs makes him a bit cranky. Three the pictures needed a lot of post editing because the sun-room casts weird shadows and the quality of the photos were dependent on the time day. Four any spare time I had for crafting for my own personal time went into organizing my craft room. I spent at total of 8 Sundays getting this little room organized. Here is a glimpse into what it looks like all cleaned and organized.
My initial problem was that from the holidays I had stuff everywhere. Here a couple before pictures. I had tons of shelving units but it was filled with stuff and nothing was labeled. Also the one window I had was completely covered.
Here is another before angle. (Notice the window at the top left all covered up.)
I need to go through organize and label to see what I had. To my surprise I had 2 full bins of pompoms? Really why so many pompoms?
I also have an entire bin of bias tape. No idea why?
Next, I need the sunlight (A MUST) when I am in the basement I feel trapped like an animal in a cage. I took away a storage unit to uncover a basement window. It is small window but even just a little bit of light really helps. I turned two storage units sideways this gave me an aisle and let me get to everything easier.
The storage unit held bins of ribbon. Instead of placing the ribbon in bins I made a wooden holder for the ribbon and placed the spools on dowels. I also added a room separator to give me a backdrop so that I didn't have to look at all the bins. I added some hair bows to the room separator I think this would be a great backdrop for some craft videos. (PS - Tomorrow's post will be how I built the ribbon rack.)
Next, I purchase a folding photography table. The light is best by the backdrop so when I need the photography table I just set it up. When I am done it folds up easily and can be placed in a corner.
I added some of my favorite things to the room. My late grandfather made these wooden cars. I added them to the room because they mean so much to me and they remind me of him. (The photo was taken using the photography table - no after photo editing was needed.)
When of my favorite shelves is the section that holds my craft books and magazines. Lots of my inspiration comes from books and magazines. I added a wooden box that my father wood-burned for me. It holds little trinkets and small gifts with meaning.
Lastly, I wanted my craft table open in the middle of the room. On the other side of the table is my children's play area. There is a TV, couch, and games. By placing my table in the middle it separates my space but still lets me interact and be with them.
I hope you enjoyed a glimpse into my craft room. I found so many neat things I forgot I had and can't wait to start sharing some of my crafts now that my Sunday free time is not spent organizing it can be for some personal craft time.
If you notice from my last post I haven't posted anything since January 1, 2012. Why you ask? My craft room was an absolute disaster from holiday crafting and I couldn't stand to be in it. I craft every day for Bowdabra but most of that crafting I was doing in my sun-room so that I didn't have to be in here. I would hurry downstairs grab a few totes and rush back upstairs to the my warm, sunny, glorious sun-room. However, the problem with being upstairs is one I am limited to what I grab in a tote. I have so much craft stuff I don't really know what I have unless it is organized. Two my husband absolutely hates craft clutter so it strewn all over the upstairs makes him a bit cranky. Three the pictures needed a lot of post editing because the sun-room casts weird shadows and the quality of the photos were dependent on the time day. Four any spare time I had for crafting for my own personal time went into organizing my craft room. I spent at total of 8 Sundays getting this little room organized. Here is a glimpse into what it looks like all cleaned and organized.
My initial problem was that from the holidays I had stuff everywhere. Here a couple before pictures. I had tons of shelving units but it was filled with stuff and nothing was labeled. Also the one window I had was completely covered.
Here is another before angle. (Notice the window at the top left all covered up.)
I need to go through organize and label to see what I had. To my surprise I had 2 full bins of pompoms? Really why so many pompoms?
I also have an entire bin of bias tape. No idea why?
Next, I need the sunlight (A MUST) when I am in the basement I feel trapped like an animal in a cage. I took away a storage unit to uncover a basement window. It is small window but even just a little bit of light really helps. I turned two storage units sideways this gave me an aisle and let me get to everything easier.
The storage unit held bins of ribbon. Instead of placing the ribbon in bins I made a wooden holder for the ribbon and placed the spools on dowels. I also added a room separator to give me a backdrop so that I didn't have to look at all the bins. I added some hair bows to the room separator I think this would be a great backdrop for some craft videos. (PS - Tomorrow's post will be how I built the ribbon rack.)
Next, I purchase a folding photography table. The light is best by the backdrop so when I need the photography table I just set it up. When I am done it folds up easily and can be placed in a corner.
I added some of my favorite things to the room. My late grandfather made these wooden cars. I added them to the room because they mean so much to me and they remind me of him. (The photo was taken using the photography table - no after photo editing was needed.)
When of my favorite shelves is the section that holds my craft books and magazines. Lots of my inspiration comes from books and magazines. I added a wooden box that my father wood-burned for me. It holds little trinkets and small gifts with meaning.
Lastly, I wanted my craft table open in the middle of the room. On the other side of the table is my children's play area. There is a TV, couch, and games. By placing my table in the middle it separates my space but still lets me interact and be with them.
I hope you enjoyed a glimpse into my craft room. I found so many neat things I forgot I had and can't wait to start sharing some of my crafts now that my Sunday free time is not spent organizing it can be for some personal craft time.
September 5, 2011
Beaded Ribbon Necklace
You know when you make something that you just can stop looking at!? That craft that instantly because your new favorite craft, ever! Until, the next new favorite craft....
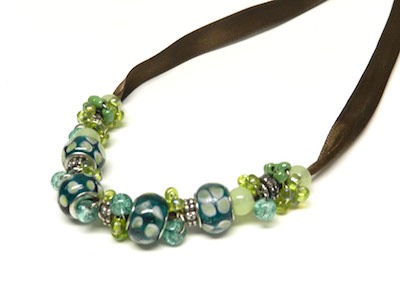
My favorite craft right now is a Beaded Ribbon Necklace I made for the Bowdabra Blog to showcase their new Ribbon-to-Bead line! The ribbon-to-bead has a wire needle attached to make beading super easy.
Isn't it so pretty!! Visit the Bowdabra Blog for the full tutorial.
Sign-up for their Bowdabra Newsletter and they will provide you with a coupon code to purchase this Designer Beaded Ribbon as a Buy One, Get One FREE! Simple sign-up for the newsletter with a valid email address and they will provide you with a coupon code – no limits or exclusions.
My favorite craft right now is a Beaded Ribbon Necklace I made for the Bowdabra Blog to showcase their new Ribbon-to-Bead line! The ribbon-to-bead has a wire needle attached to make beading super easy.
Isn't it so pretty!! Visit the Bowdabra Blog for the full tutorial.
Sign-up for their Bowdabra Newsletter and they will provide you with a coupon code to purchase this Designer Beaded Ribbon as a Buy One, Get One FREE! Simple sign-up for the newsletter with a valid email address and they will provide you with a coupon code – no limits or exclusions.
![]() |
| Click to go to their newsletter sign-up page. |
May 23, 2011
Best Teacher Award
Help children show their appreciation to their favorite teacher with a Best Teacher Award. At the end of the school year I am always faced with what to give my kid's teachers. How many mugs or lotion gift baskets can one person really have?
I created a Best Teacher Award for the Bowdabra Blog using both card stock and ribbon. The great thing about this tutorial is that it is kid-friendly and my children can help fold the cardstock and create the bow. My kids are so excited to give each of their teachers and teacher's helpers their homemade Teacher's Awards.
March 17, 2011
Bowdabra Spring Hair Bows
Bowdabra Ribbon Crafts & Things Store carries not only Bowdabra products but also a HUGE selection of Morex Ribbon. Today using my Mini Bowdabra and the Hair Bow Tool & Ruler to make several Spring Hair Bows.
The Hair Bow Tool & Ruler comes with an Interactive CD that gives step-by-step instructions on how to make 70 different hair bows.
I used the CD to make these Spring Bows.
Craft Designer: Sarah Forhan
Follow on Twitter @sarah_forhan
Sewing & Crafting with Sarah on Facebook
Bowdabra Ribbons Crafts & Things on Facebook
Stumble It:
The Hair Bow Tool & Ruler comes with an Interactive CD that gives step-by-step instructions on how to make 70 different hair bows.
I used the CD to make these Spring Bows.
Boutique Bow with a Ribbon Spray Topped with a Bow Tie
Morex Ribbon Used:
Bow Tie topped with a Basic Bow 6 Loops
Morex Ribbon Used:
Boutique Bow topped with a Boutique Bow with Tails
Morex Ribbon Used:
Disclosure: I am the inventor of the Hair Bow Tool and Ruler and the creator of the Interactive CD
Craft Designer: Sarah Forhan
Follow on Twitter @sarah_forhan
Sewing & Crafting with Sarah on Facebook
Bowdabra Ribbons Crafts & Things on Facebook
Stumble It:
Subscribe to:
Posts (Atom)


.jpg)