Showing posts with label crafts for kids. Show all posts

June 26, 2013

Summer Craft for Kids DIY Button Frame

Kids bored during the summer time?  Looking for a fun summer craft?  Design a DIY button frame with a mosaic style finish. 

Here are some photos of my daughter creating her button frame. 


For the entire tutorial visit the Bowdabra Blog here - http://bowdabrablog.com/2013/06/26/kids-craft-mosaic-button-picture-frame/

February 5, 2013

Kids Arts and Crafts Ladybug Tic Tac Toe

This Valentine's Day I will be visiting the kids in my daughter's classroom and doing an arts and crafts project with them.

My goal when visiting, for a party, is that the craft is no mess!  No mess makes it easier for the kids, easier for the teacher, and so much easier for me!


This year the kids will be making a ladybug and then using the ladybug as a board to play tic tac toe. The craft is fairly simple and the kids can make it in under ten minutes.

Materials Needed: 
  • Black Construction Paper
  • Red Construction Paper
  • 1 Black Pipe Cleaner (makes 4 Antennas)
  • Foam Heart Stickers
  • Googly Eyes
  • 2 Brads 
  • Silver Painters Pen or White Chalk
  • Candy for playing tic tac toe (buttons or foam would work, too)

Instructions:
1.  Begin by cutting out your ladybug pattern.  I designed a pdf template for download here.  You will need two wings and the ladybug's body is folded in half - cut along the fold of the paper.

 2. Next, gather all the materials that you will need for the project.  There are 20 students in my daughter's class.  I have pre-cut the wings and ladybug's body for them.  I also hole punched places for the antennas and wings.

3.  Kids can design the ladybug's face by adding hearts, googly eyes, and pipe cleaner antennas.  They can decorate the wings with more stickers or even use markers.  Next, you can add a tic tac toe board for them using a silver painters pen or have them make their own using white chalk.


4. Kids can attach the wings using brads.  Then they just need to open the wings to play a game of tic tac toe!


--> Follow my blog with Bloglovin

October 29, 2011

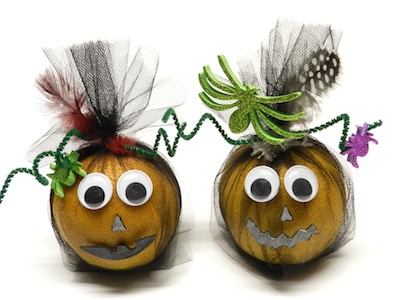
Deranged Orange Halloween Heads

Create these easy "Deranged" Halloween heads as a fun classroom craft.  To make this craft I used oranges for the base of the head.  I wanted to use oranges so that after Halloween kids have a healthy food option.  - Fun little twist on all the candy that usually accompanies Halloween festiveness.

Materials:
Black 6" Tulle
Rubber-bands
Googly Eyes
Foam
Halloween Foam Stickers
Green Pipe Cleaners
Craft Feathers
Glue Dots Craft
Scissors
Pinking Sheers (optional)

Instructions:
1. Purchase oranges to use to create your deranged Halloween heads.


2. Cut two tulle strips, 12" long.  Fold the strips and half and the place then in a X.  Place the orange in the center.


3. Hold the tulle in place with a small rubber-band.


4. Trim the top of the tulle with pinking sheers.


5. Wrap a pipe cleaner around the top of the rubber-band.  Add a feather to the pipe cleaner.  Twirl the ends of the pipe cleaner around your finger to create fun ringlets.

6. Using Glue Dots Craft attach googly eyes, a nose, mouth, and some Halloween foam stickers.

* I will be bringing oranges into my daughter's 3rd grade class to make this craft.  However, I will cut the tulle and rubber-band it in place for all the kids.  The kids should have fun decorating the heads but the tulle might be too difficult.

August 17, 2011

Perler Bead Dollhouse Furniture

It is all about the dollhouse furniture in our household!  My father is building a dollhouse for my daughter and all she can think about is the little furniture she wants to put in it!  Visit Crafts Unleashed to read his latest dollhouse post.  The dollhouse is really coming along and the more progress that is made the more excited she is getting about the dollhouse.

We are also big into Perler Beads at our home.  My daughter loves to create with them.   Secretly, I think she just loves making me stop whatever I am doing so that I can break out the iron - to iron her designs...but that is for another post.

Recently, I found dollhouse furniture designs on the Perler Bead Website.  The designs are so amazing and creative.  I also loved that my 8yr-old could easily follow them on her own....the only thing I had to do was IRON them.  Here are a few of her designs. She made a bed with a removable comforter and pillow, a love seat, and a table. Next, on her list to create a Perler Bead Grand Piano!


August 8, 2011

Back-to-School: Homework Monster Journal

Create a homework monster journal using a plain notebook, construction paper, googly eyes, and glue dots.  Lets face it homework is no fun for kids or parents.  I don't know how many times I have sat at the kitchen table helping my children with their homework thinking homework is the most evil chore ever!  These kids should be outside riding their bikes, climbing trees, anything but having to sit here and do homework after a long day of school.

Why not have a little fun with the dreaded homework and make a homework monster journal!

First begin by purchasing a plain inexpensive plain notebook.


Next, have children cut a monster body out of construction paper.


Cut out the monster's features: nose, mouth, ears, tail, and claws.


Using glue dots attach the monster's features to the notebook. Layer the features using glue dots.


Optional: Using acrylic painters pens write Homework Journal along the binding or the front cover.


*This craft tutorial has been donated to Crafts 4 Kids.  A non-profit kids craft site.

August 3, 2011

Princess Birthday Party

A princess style birthday party fit for a PRINCESS!  I like birthday parties with themes.  The theme is usually whatever my child is "into" a the time.  I always ask my kids to pick whatever theme they want for their birthday and then I go from there. 

Though the Bob the Builder theme several years ago might go down in history as my all time favorite.  Something about seeing everyone in bright yellow hard hats still makes me chuckle!  The princess theme was by far the easiest for me to pull off.  I asked all the little girls to arrive in their favorite princess costume and then I decorated our sunroom in true princess style.

Every princess needs a grand entrance.


I bought little Disney princess chairs and lowered my folding table to small princess height.


I added princess window clings to the sunroom windows. 


I made little wands for each princess.  I used tulle, ribbon strands, and my Bowdabra.


And, of course, whats a princess without some jewelry and bling!


To make some more homemade princess decorations visit my tutorials at the Bowdabra Blog.

Clothespin Fairies - Design little fairies with tulle tutus and ribbon wings.  Children can make them at the party and then bring them home as party favors.


Ribbon Rings - Create beautiful and customized ribbon rings using Bobbin Ribbon and Perler Beads.

August 2, 2011

Back-to-School: School Supplies Trinket Box

My children love minis, anything small that they can hold their treasures in.  I designed a very easy little box for my daughter to hold small little things for school like: milk money, rubber-bands, paper clips, pencil sharpener, and erasers.  I wanted the trinket box to be something special for her to keep her little treasures in but wouldn't take up a lot of room in her school desk.

 Materials Needed:
  • Altoids Tin
  • Scrapbooking Paper
  • Gems
  • Small Magnets
  • Buttons
  • Scrap Ribbon
  • Glue Dots
Instructions:

1. Begin by removing the top of the Altoid tin to make it easier to work with. 

2. Decorate the front of the tin with cardstock.  Adhere the paper to top of the tin using Glue Dots.

3. Add little gems using small Glue Dots.  Attach buttons to extra strong magnets using medium sized Glue Dots.  I love the little magnets because they can hold little notes on the outside of the box if they want.  Great way for those important bus notes to not get lost in their bag.  Just, attach them to the front of the tin!

4. Attach a coordinating scrap ribbon around the edge of the tin.

5. Re-attach the tin cover and place little school supply treasures inside of your trinket box.

July 28, 2011

Personalized Name Art

Create affordable name art using small little canvases.  Hinge the small canvases together to allow them to easy fold together and make the perfect holiday or birthday gift. 

Visit my craft tutorial at Crafts Unleashed for supply list and step-by-step pictures.


July 21, 2011

Simplicity

Sometimes it is just about the simplicity! 


I love Izze sparkling water!  I love how it tastes and I love the bottle that it comes in.  I hate to throw away the bottle when I am done because they are just so darn cute!

So instead of throwing them away I recycled a few to use as small vases on my kitchen counter-top.  I added some Lazy Susan's (given to me by my wonderful neighbor) and some dyed daisies.  Daisies are super easy to dye (and a great kid's project, as well.)  Add some cut daisies to some water filled with food coloring.  As the flowers absorb the water and food coloring the petals will change color. 

June 29, 2011

Made by Me Wooden Beading Loom Review

Recently, I created a woven beaded bracelet using Darice's Beading Loom.  I had so much fun using the beading loom!  You can see my finished bracelet along with read my experiences of beading weaving, for the first time, at: Crafts Unleashed.  I had so much fun weaving that I thought if I could find a children's beading loom kit that my 8yr old daughter would really enjoy it, as well.

The Made by Me Wooden Beading Loom Kit comes with the loom, 12 packages of seed beads, 2 beading needles, 6 jump rings, 1 spool of beading thread, 4 metal clasps, 2 spools of elastic cords, and 1 key ring. 


It was a very impressive kit and my daughter was super excited to start to weave beads just as I had done a few weeks ago. 

We added the strings on to the loom according to the detailed instructions. 


I loved the concept of using the springs as spacers for the thread, I also loved that the wooden dowels on the end could make the thread tighter as you went.  The hardest part for me when I was weaving is that eventually your thread loses tension and weaving becomes difficult.  This kit allows you to move the dowels on the end to keep tension on the thread at all times; making weaving so much easier!

Here is my daughters finished bracelet; red, white, and blue themed woven bead bracelet.  She is so proud of her final bracelet and that she could weave it all by herself. 


I finished the bracelet for my daughter by tying the ends together and adding the finishing hardware.  Lastly, just to be safe I added an extra strand of thread through each of the bead rows (shh..though we won't tell her that).

Disclosure: I bought the Made by Me Bead Weaving Loom and was not compensated in any way for my review. 

March 23, 2011

How to Blow and Dye Easter Eggs

Springtime is a wonderful time to decorate your home. I love to decorate my home with natural elements and spring is no exception. Actually, as the outdoors starts to become alive with new growth it seems even more fitting to have “green” décor in your home. With the arrival of spring, the coming of Easter, and Earth Day this craft is all encompassing and one of those crafts that can stay up in your home for months.

Though dying, blowing and decorating eggs are not necessarily hard, it is time consuming.


How to Dye and Blow Eggs

Materials Needed:
  • White Eggs
  • Lemon Juice
  • Egg Dying Kit
  • Yarn Needle

Instructions:

1. Begin by dying the white eggs. To dye the eggs I fully submersed the eggs in a mixture of half part lemon juice half part warm water for 20 minutes.

 
2. Allow eggs to dry for at least an hour.


3. When eggs are fully dry; pierce the top of the egg with a yarn needle. Turn the egg over gently pierce the bottom of the egg, as well. Rotate the yarn needle inside of the egg to break-up the egg yoke and to enlarge the bottom hole slightly. I have experimented with many types of piercing tools. The reason why I recommend a yarn needle, versus anything else, is because of its very sharp point and because of its gradual tapering, unlike a nail that has a sharp point but then gets larger in diameter right after the point.


4. Place a bowl below your egg, in the smaller hole at the top of the egg, blow with steady bursts of air. The eggs contents will start to flow through the larger bottom hole. Wash your lips immediately after with warm water because there may be some dye that gets on your lips. I looked in the mirror right after doing this and I did have green lips. However, it came right off with a wash cloth and some warm water.
 
5. Follow the above steps for all of your colored eggs.


Craft Notes: Unfortunately, the eggs’ contents are not safe to eat because of the length of time the eggs have been sitting out drying and unrefrigerated. If you prefer to be able to reuse the egg yokes for cooking you must blow the eggs before dying them. However, cold eggs are very hard to blow. I would recommend letting the eggs sit on the counter for at least 10 minutes before blowing. To dye the eggs that has already been blown DO NOT use vinegar or lemon juice with the dye. The vinegar and lemon juice create a weird chemical reaction with the inside of the eggs and the dye becomes very foamy. Only use water and dying tablets and allow the eggs to dry for several hours. Water and dye will leak through the holes of the eggs.

Original Post at Crafts Unleashed
Craft Designer: Sarah Forhan
Follow on Twitter @sarah_forhan
Sewing & Crafting with Sarah on Facebook
Bowdabra Ribbons Crafts & Things on Facebook
Stumble It:

September 22, 2010

Kids Craft Bat Halloween Decoration

I prefer to decorate my home for each holiday with my children's crafts.  They always have such fun making the decorations and I enjoy seeing them up.  Honestly, it makes me happy every time I look at them.  I am not sure what I am going to do when they stop wanting to do crafts with me?  But until then I will relish the time spent crafting and decorating the home with them.

Here is an easy bat that kids can make for a Halloween decorations, even make several bats and hang them with string in the windows.

Materials:
Black Card Stock
Black, White, and Black Glitter Foam
Silver Glitter Glue
Googly Eyes
Scissors
Tape
Glue Dots

Instructions:
1. Begin by folding a standard size piece of card stock in half.  Then cut the card stock along the fold.
2. Next, fold the card stock into an accordion shape.

3. Fold each end together and tape them to form a circle.  Do not tape it tightly but rather just let the ends meet.

4. Glue dot fangs, eyes, and googly eyes on the bat's face.

5. Cut out bat wings and tape them along the back of the bat's face.

6. Lastly, using silver glitter glue embellish the bat's wings.


Find all of your materials at AllCraftSupplies.com

Disclosure

Email Updates Daily by Feedburner

Enter your email address:

Delivered by FeedBurner